Add chapter markers to a screen recording as you record
Adding chapters after a recording usually means scrubbing back through it, guessing where each section started. It is much easier to add chapter markers to a screen recording while you record, at the moment each section begins. In Cheap Recorder that is one key: M. This guide shows how to mark sections as you go, the one option that decides whether those marks become real chapters, and a worked example of a lesson with five chapters.
What a marker does while you record
A marker is a note of a moment. During a recording you press M on your keyboard, or the Add marker button, and a short note on the page confirms the time. You keep talking and keep working.
Marking at the start of each new section gives you a list of where every part of the video begins. Later, that list can become chapters that a viewer clicks to jump straight to the part they need. For a course lesson, a client demo or a long walkthrough, that saves your viewer from dragging through the whole video.
Two small rules apply. Markers are only added while a recording is running. And pressing M does nothing while you are typing in a text box, so a marker is never added by accident when you type a word with an M in it.
Choose where your markers end up
This is the part people miss, so read it before you record. Where your markers go depends on one tick under Options: Also save every source separately.
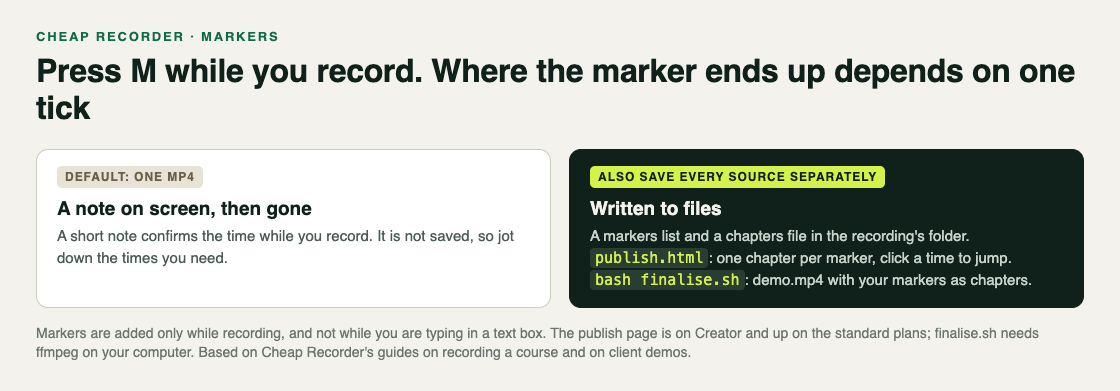
- Default, one MP4: the marker notes appear while you record, but they are not saved anywhere. If you need the times, jot them down as each note appears.
- Also save every source separately ticked: the markers are written to files. The recording's folder gets a markers list and a chapters file, and those markers become chapters in the two things built from them, below.
With the option ticked, the Separate sources folder also holds a page file, publish.html, on Creator and up on the standard plans. It shows Chapters, one per marker, and clicking a chapter's time jumps the player to that moment. Below them, the transcript shows times and speaker names when the live transcript was on, and clicking a time there jumps the player too. It also holds a script, finalise.sh. Run bash finalise.sh in that folder on a computer with ffmpeg installed, and it makes demo.mp4 with your markers added as chapters.
Two trade-offs come with the tick. Every source is saved as its own file, so the card does not offer Download MP4 or Convert; everything you need is already in the folder. And the page cannot be added afterwards: if you forget the tick, a single MP4 is saved, and you would need to record again to get it.
How to add chapter markers to a screen recording
- Write a short outline. List the sections of the video in order. Each one will get a marker, so the outline becomes your chapter list.
- Tick the option. Open Options and tick Also save every source separately. Leave Live transcript ticked if you want a transcript with times on the page too. While it is on, Chrome sends your microphone audio to Google to turn it into text.
- Set up as usual. Choose your folder, pick what to capture, and check your microphone.
- Name it. Type a name in Name this recording. Numbering, such as Lesson 04, keeps a course's files in order, because the name is used for the file and its folder.
- Record and mark. Press Start recording. At the first words of each new section, press M or Add marker, and glance at the note that confirms the time.
- Finish. Press Stop and finish. The markers list and chapters file are in the folder.
Before a real recording, make a one-minute practice with two markers and open its publish.html. You see exactly what your viewer will get, and you learn the rhythm of pressing M as you talk.
A worked example: a lesson with five chapters
Say you teach spreadsheets and you are recording Lesson 04, about formulas. It runs about twenty minutes, and you want students to jump straight to the part they are stuck on.
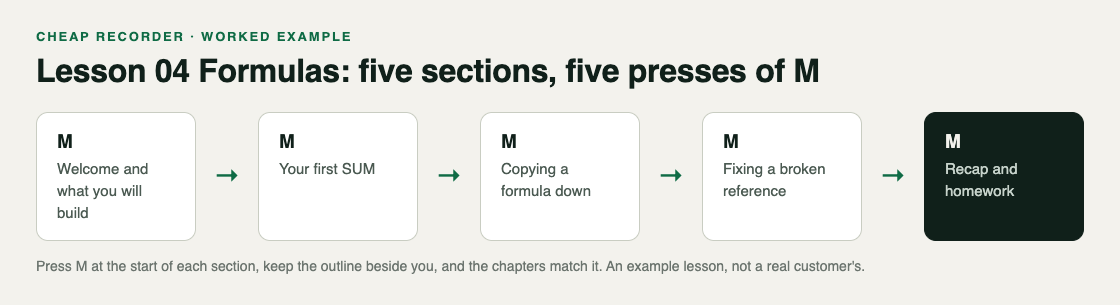
- You write the outline on a card beside the screen: welcome and what you will build, your first SUM, copying a formula down, fixing a broken reference, recap and homework.
- You tick Also save every source separately and Live transcript under Options, and name the recording Lesson 04 Formulas.
- You record a 30-second test first and play it back, to catch a wrong microphone before you lose a whole lesson.
- You start the real recording and press M as you say your first words. Each time you move to the next line on the card, you press M again. Five sections, five markers.
- You press Stop and finish, then open publish.html from the Separate sources folder in Chrome. The Chapters list shows five times. You click the fourth one, and the player jumps to fixing a broken reference.
- For your course platform, you run bash finalise.sh in the same folder. It makes demo.mp4 with your five markers as chapters.
If one section goes badly, short lessons are easier to re-record than long ones. That is one more reason to plan sections before you start.
When markers go wrong
Pressing M did nothing. Either the recording had not started yet, or a text box had the cursor. Click on an empty part of the page and press M again.
The page says No chapters were marked. The recording had the option ticked but no markers were pressed. Record again and press M at each section.
There are no marker files at all. Also save every source separately was not ticked, so only a single MP4 was saved. The times you jotted down are your chapter list for this one.
The course checklist covers the rest of a lesson setup, and the post on recording a tutorial with webcam and screen covers placing your camera. If the video is for a client rather than a student, the client demo post shows how to send the page and its folder, and the publish page guide lists everything on it.
Frequently asked questions
How do I add a marker while recording?
Press M on your keyboard or the Add marker button while the recording runs. A short note confirms the time.
Why are my markers not saved?
Markers are written to files only when Also save every source separately is ticked under Options. With the default single MP4, the notes show while you record but are not saved.
Can I add chapters after I finish recording?
Not if the option was off. Marker files and the publish page are written only when Also save every source separately was ticked before recording, and the page cannot be added afterwards.
Do the chapters end up in the video file?
Yes, in demo.mp4. Run bash finalise.sh in the Separate sources folder with ffmpeg installed, and it adds your markers as chapters.
Get started
The free plan needs no card. Try Cheap Recorder in Chrome, tick one option, and press M at every new section.
Comments
No comments yet.
Sign in or make an account to comment.