How to analyze a historical photograph: 4 steps
If you want to know how to analyze a historical photograph, start with one idea: a photo is not a window, it is a choice. Someone decided where to stand, what to put in the frame, what to leave out and when to press the shutter. The four steps below come from the National Archives document analysis worksheets, which teach the same careful reading for maps, posters, cartoons and photographs. This post explains each step, then walks you through one real photograph from the American Civil War.
Why a photograph needs analysis, not just a look
Photos feel like proof. They seem to show the past exactly as it was. That feeling is the reason to slow down.
A photograph shows one moment from one angle. It does not show what happened a minute before or after, or what stood just outside the frame. Some photos were posed, with people placed and told to keep still. Some were taken to persuade, to record, or to sell newspapers. The caption, too, was written by someone, sometimes years later.
So the question is never only "what does the photo show?" It is also "who took it, when, and why?" That is the same question you ask of any source, as our guide to how to analyze a primary source explains.
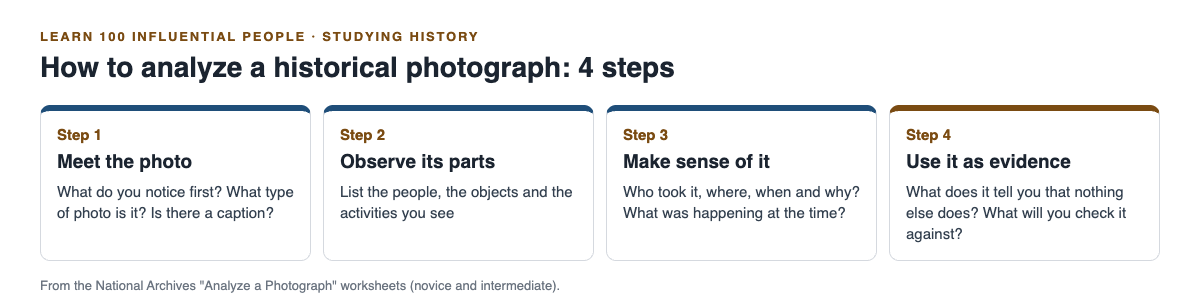
The four steps, in the order the worksheets use them.
Step 1: Meet the photo
Start with a quick look. The intermediate photograph worksheet asks you to scan the photo and note what you notice first.
Then name the type of photo. The worksheet gives a list to tick: portrait, landscape, aerial or satellite, action, architectural, event, family, panoramic, posed, candid, documentary, selfie or other. Two of these matter most for history. Is it posed, with people arranged for the camera, or candid, caught as things happened? The answer changes what the photo can prove.
Last, check for a caption. The novice worksheet asks whether the photo is black and white or in colour, and if there is a caption, what it tells you.
Step 2: Observe its parts
Now slow down and list what is there, before you decide what it means. The intermediate worksheet asks for three lists:
- People. Who is in the photo? Where are they standing, and what are they wearing?
- Objects. What things can you see, and what might each be used for?
- Activities. What is going on? Is anyone doing something, or are they all still?
The novice worksheet adds a small task that works at any level: write two words that describe the photo. It sounds simple, but it makes you notice the mood, not only the contents.
Keep describing and explaining apart. "Two men in a tent" is a description. "The general is trying to win the president over" is already a guess, and it belongs in the next step, with evidence.
Step 3: Try to make sense of it
This is where you think, not just look. The intermediate worksheet asks:
- Who took this photo?
- Where is it from, and when?
- What was happening at the time in history it was taken?
- Why was it taken?
It then asks you to list the evidence, from the photo itself or from what you know about the photographer, that led you to your answers. The worksheet admits you may not know everything: answer as best you can, and let the caption help.
The novice worksheet adds two useful questions. List something in the photo that helps you prove where it was taken. And how does the photo compare to modern times? Spotting what has changed is a quick way into what was different then.
Step 4: Use it as historical evidence
The last step turns the photograph into evidence for an argument. The worksheet's key question is this: "What did you find out from this document that you might not learn anywhere else?"
Then ask what other documents or historical evidence you will use to check it. A photo is strong evidence of what was in front of the camera, such as what people wore, how a place looked, or who met whom. It is weak evidence of what people thought or why things happened. For those, you need words: letters, speeches, reports. The National Archives page makes the same point: "Analysis is just the foundation."
Worked example: how to analyze a historical photograph from 1862
Open "Lincoln and McClellan after the Battle of Antietam" on World History Encyclopedia and work through the four steps. Give it about 20 minutes, and write your answers down.
- Meet the photo. Note what you notice first. Then read the caption on the page: President Abraham Lincoln with General George B. McClellan in McClellan's tent after the Battle of Antietam, photograph by Alexander Gardner, 3 October 1862. Decide on the type: is this a posed portrait of two men, or a candid moment caught as it happened? Write down what in the photo makes you think so.
- Observe its parts. List the people, the objects inside the tent and what the two men are doing. Write two words that describe the photo.
- Make sense of it. The caption answers who (Alexander Gardner), where (McClellan's tent) and when (3 October 1862). For what was happening, read World History Encyclopedia's Abraham Lincoln article. It says Lincoln made McClellan general-in-chief of the Union armies in late 1861, that McClellan was popular with the army but over-cautious, and that the two constantly butted heads about strategy. It also says the Confederate invasion of Maryland was turned back at Antietam.
- Use it as evidence. Ask what the photo shows that words do not: the president himself in a general's tent, soon after a battle. Then check it against the written record. The same article says Lincoln fired McClellan, and that Lincoln later beat McClellan, his Democratic opponent, in the November election that gave Lincoln his second term. A still photo of two men in a tent does not show any of that tension. That is exactly why a photo needs other sources next to it.
Now try a harder one. World History Encyclopedia's "Lincoln at Gettysburg" is described as one of only two known photographs showing Lincoln at Gettysburg on 19 November 1863, seated in the centre. Its photographer is unidentified. Work through step 3 again: what can you still say about who took it and why, and what can you not say? Writing down what you do not know is part of good history, as our guide to primary vs secondary sources shows.
Frequently asked questions
What are the four steps to analyze a historical photograph?
The National Archives worksheets use four: meet the photo, observe its parts, try to make sense of it, and use it as historical evidence.
Is a historical photograph a primary source?
Yes, for the moment it shows. A photo taken in 1862 is a primary source for 1862, though its caption may have been written later.
How can I tell if a photo was posed?
Look at how people are placed and whether anyone is moving. The intermediate worksheet asks you to decide between posed and candid as part of meeting the photo.
What if I do not know who took the photo?
Say so, and work from what you can see and the caption. The worksheet asks you to answer as best you can and to list the evidence behind each answer.
Get started
Photographs, letters and speeches are how you meet the people who shaped history. Learn 100 Influential People teaches the 100 people who most shaped human history, from Moses to the web, in 46 lessons of about 9 minutes, where you read, study the diagrams and try hands-on activities. Its 272 questions check what you learned, 38 cards set out where researchers disagree, and every lesson lists its sources. Sign in with your email and an emailed code, and read what the site is for.
Comments
No comments yet.
Sign in or make an account to comment.