How to analyze an artifact: reading objects as evidence
If you want to know how to analyze an artifact, start with one idea: an object is evidence, just like a letter. A pot, a coin, a tool or a carved stone was made by someone, for a purpose, with the materials and skills of their time. The things people made and used are a record of their lives in their own right. The four steps below come from the National Archives document analysis worksheets. This post explains each step, then walks you through one of the most famous objects in history.
Why objects count as historical evidence
A written source tells you what someone chose to say. An object tells you what people actually made, used, wore or threw away. It can show you how rich or poor they were, what tools they had, and what they valued enough to decorate.
Objects have limits too. They rarely explain themselves. A bowl does not tell you who ate from it or what they thought. So reading an artifact means careful looking first, careful guessing second, and checking your guesses against other sources. Our guide to how to analyze a primary source uses the same habits for documents.
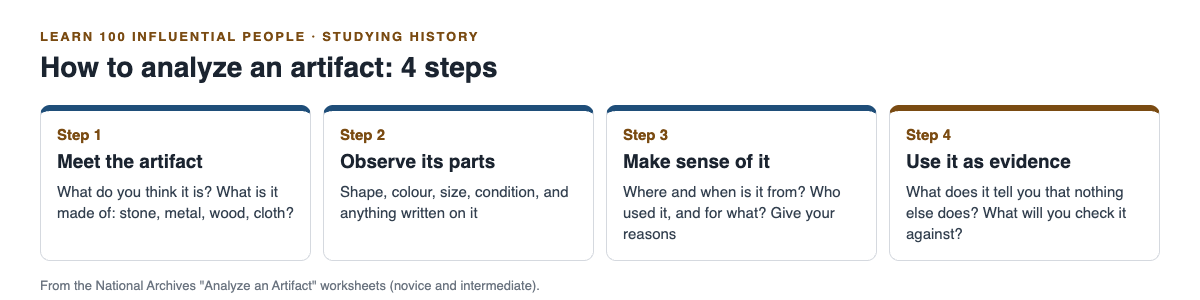
The four steps, in the order the worksheets use them.
Step 1: Meet the artifact
Start with your first guess. The novice artifact worksheet simply asks: what do you think it is?
Then name the material. The intermediate worksheet gives a list to tick: bone, pottery, metal, wood, stone, leather, glass, paper, cardboard, fabric, plastic or other. The material is already evidence. Stone lasts and cloth rots, and each says something about who made the object and how long it was meant to last.
Step 2: Observe its parts
Now look closely, before you decide what it means. The intermediate worksheet gives one of the best instructions in any of the worksheets: "Describe it as if you were explaining it to someone who can't see it."
It lists what to think about: shape, colour, texture, size, weight, age, condition, moving parts, and anything written on it. The novice worksheet makes size easy to judge: is it small like a coin, medium like a basketball, or large like a car? It also asks for three words that describe the object.
Condition matters more than students expect. A broken edge, wear on a handle or a missing piece tells you about the object's life after it was made.
Step 3: Try to make sense of it
This is where you think, not just look. The intermediate worksheet asks you to answer as best you can:
- Where is it from, and when?
- Who used it, and what was it used for? List your reasons for each answer.
- What does it tell you about the people who made and used it?
- What does it tell you about the technology of its time?
Both worksheets end the step with a comparison to today. The intermediate one asks for a similar item from today; the novice one asks whether we still use this object and how it is different. Comparing a thing with its modern cousin is a quick way to see what has changed.
Step 4: Use it as historical evidence
The last step turns the object into evidence for an argument. The worksheet's key question is this: "What did you find out from this artifact that you might not learn anywhere else?"
Then ask what other documents or evidence you will use to understand the time it comes from. An object and a text together are much stronger than either alone. The National Archives page makes the same point: "Analysis is just the foundation."
Worked example: how to analyze an artifact like the Rosetta Stone
Open World History Encyclopedia's article on the Rosetta Stone and work through the four steps. Give it about 20 minutes, and write your answers down.
- Meet the artifact. The article calls it a stela, a carved stone slab, made of grey and pink granodiorite. Write down the material and why a decree might be carved in stone rather than written on papyrus.
- Observe its parts. The article gives its size: 112.3 by 75.7 cm, and 28.4 cm thick. It carries three blocks of writing: 14 lines in hieroglyphs, 32 in demotic and 54 in Greek. Note its condition: the two top corners and the bottom right corner are missing, so none of the three texts is complete.
- Make sense of it. The article dates it to 196 BCE. The text is a decree by a council of priests at Memphis honouring King Ptolemy V, one year after his coronation. It praises his rule and orders that the decree be set up in stone, in three scripts, in all temples. Ask: who was meant to read each script, and why would priests praise a king this way?
- Use it as evidence. Ask what this stone shows that nothing else did. Because the same decree appears in three scripts, scholars could use the Greek to work on the hieroglyphs. The article says Thomas Young first identified some hieroglyphs relating to Ptolemy V, and Jean-François Champollion fully deciphered the text in the early 1820s.
Last, trace the object's own story. The article says it was found in 1799 by Pierre François Xavier Bouchard, an officer of engineers in Napoleon's army, in an old wall being pulled down at Rosetta on the Nile Delta, and that it was later seized by the British and is now in the British Museum. Where an object is kept, and how it got there, is part of its history too. Put the dates on a timeline; our guide on making a history timeline shows how.
Frequently asked questions
What are the four steps to analyze an artifact?
The National Archives worksheets use four: meet the artifact, observe its parts, try to make sense of it, and use it as historical evidence.
Is an artifact a primary source?
Yes. An object made or used at the time you are studying is a primary source, like a letter or a photograph from that time.
What should I describe first when looking at an object?
Its material, then its shape, colour, size, condition and any writing on it. The worksheet suggests describing it as if to someone who cannot see it.
Why compare an artifact with something from today?
Both worksheets ask you to. The comparison shows what has changed in how people live and what they could make.
Get started
Objects, maps and documents are how you meet the people who shaped history. Learn 100 Influential People teaches the 100 people who most shaped human history, from Moses to the web, in 46 lessons of about 9 minutes, where you read, study the diagrams and try hands-on activities. Its 272 questions check what you learned, 38 cards set out where researchers disagree, and every lesson lists its sources. Sign in with your email and an emailed code, and read what the site is for.
Comments
No comments yet.
Sign in or make an account to comment.