How to publish your first article on Electrified
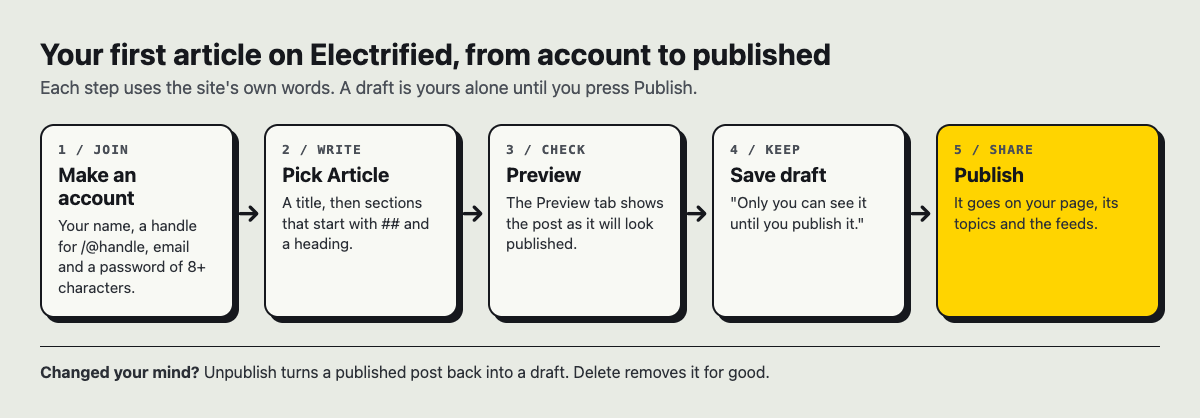
This guide shows you how to publish your first article on Electrified, from making an account to pressing Publish. The short answer: make an account at /join, open the editor, choose Article, write with ## headings, add up to five topics, save a draft, check the preview, then publish. The rest of this post walks through each step with one worked example, so you can follow along with your own piece.
How to publish your first article on Electrified, and why
Electrified is a site to write and be read. vlvd.net publishes its practical guides there, on AI safety, security testing, study skills, history and games. Anyone can make an account and post notes and articles alongside them, follow people, like and comment.
That mix is useful for a first article. Your post appears on the home page with everyone else's, listed newest first. It also sits on your own page and under the topics you choose, so a reader who lands on one post can find the next one.
For this guide, picture a simple first article. You run a small team and want to write up how you keep a shared list of recurring problems and their fixes. It is practical, it is about something you know, and it fits a single page. If you want to see how a finished piece on a similar subject reads, look at this guide to a small team knowledge base for problems and fixes.
Set up your Electrified account and profile
Go to the join page. It asks for four things:
- Your name, as readers will see it.
- Handle. Your page will be at
/@handle. Use letters, digits and underscores, 3 to 20 characters. - Email.
- Password, at least 8 characters.
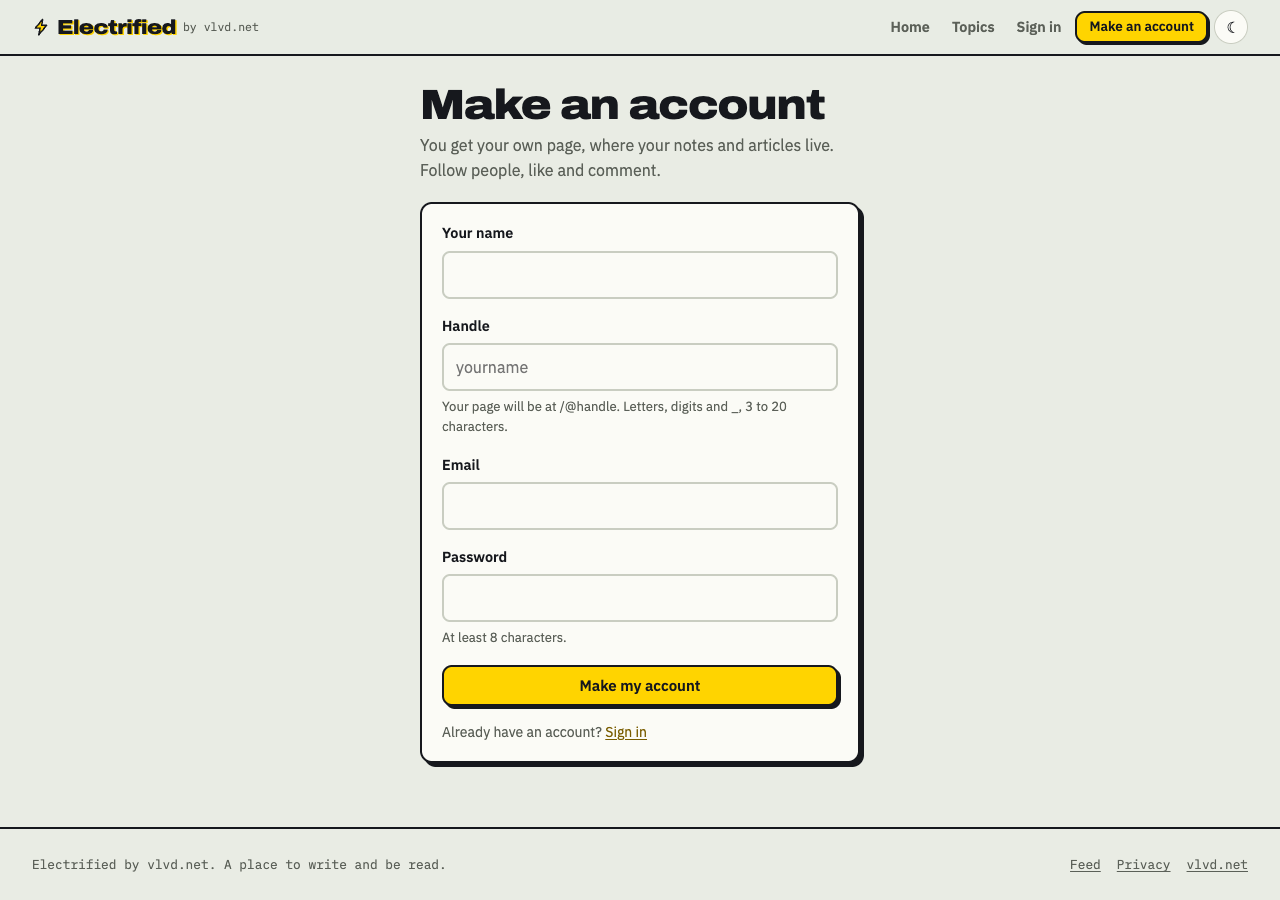
Press Make my account. You now have your own page, where your notes and articles live.
Two choices here matter more than they seem. First, pick your handle with care. The Settings page does not change a handle, email or password, so treat the handle as permanent. Second, store your password somewhere safe. The sign in page says plainly that password reset is not available yet.
Next, open Settings. You can set your Name (2 to 40 characters), a Bio of up to 280 characters, and a Website. The bio shows at the top of your page, so write one line that tells a reader what you write about. For our example: "I run a five person support team and write about fixing the same problem only once."
Pick a topic readers are already searching for
Before you write, see what people already read and write about here. The topics page lists every topic, biggest first, with its post count. Each topic links to a page of every post about it.
Use that page in two ways. If a topic you know is already large, your post joins a page that already holds many related posts. If your subject is missing or small, you have room to write the first clear piece on it.
Then narrow your idea to one question a reader would type. "How do I track problems at work" is too wide. "How to track work problems without a ticket system" is a question someone actually has, and you can answer it in one sitting. You can see that exact angle handled in this post on tracking work problems without a ticket system.
A good test: can you state the answer in your first two sentences? If yes, you have a topic. If not, cut it down further.
Write and format your first draft in the editor
Signed in, open the editor at /write. You choose between two kinds of post:
- Note: a short post of up to 500 characters, with no title.
- Article: a title and as many sections as you need, up to 60,000 characters in total.
Choose Article. The home page also has a quick "Post a note" box, but that posts straight away, so use its "Write an article instead" link when you want a full piece.
The body uses simple formatting marks. The editor's own hint lists them: **bold**, *italic*, [link](https://...), - lists, > quotes and ## headings. It also reads numbered lists, inline code and --- rules.
Start each section with ## and a heading. Here is the skeleton for our example article:
## The short answer: keep one shared page per recurring problem, with the fix and who last used it.## What goes on each page: a bulleted list of the five fields you record.## A worked example: one real problem from last month, written up in full.## What to do when the fix stops working.## Questions people ask: three short questions, each with a short answer.
That shape follows the pattern vlvd.net uses for its own guides: the answer comes first, then an example, then follow-up questions. You do not have to copy it, but it is a reliable way to write a first article that a reader finishes. For more on opening strong, the structure in this four part plan for an essay introduction works for any subject, not only history.
Switch between the Write and Preview tabs as you go. The preview looks like the published page, so this is where you catch a heading that did not render or a link with a typo.
One note on pictures. The editor has no picture button. An article can show pictures uploaded to Electrified (PNG, JPEG or WebP, at most 2 MB), but those are uploaded through the site's images API with a personal token. For a first article, plain text with clear headings is enough.
Add a title and topics before publishing
Your title can be up to 140 characters. Make it say what the reader gets. "Tracking Problems" is vague. "How to Track Work Problems Without a Ticket System" tells the reader and a search engine exactly what the page answers.
Then add topics. You can add up to 5, separated by commas, and each must be under 40 characters. Each topic links to a page of every post about it. For our example you might enter:
teamwork, problem solving, knowledge base
Check the topics page first and reuse names that already exist where they fit. A post filed under an existing topic sits next to related posts. A one off spelling of the same idea sits alone.
Now press Save draft. The editor confirms: "Saved as a draft. Only you can see it until you publish it." A draft is seen only by you and never by a search engine. Its page says "This is a draft. Only you can see it." Open it, read it once as a stranger would, and fix anything that trips you.
If you use a writing assistant, you can create a personal token in Settings. A token lets a tool start and edit your drafts only. It cannot publish, delete, like, comment or follow. The token is shown once, so copy it then, and revoke it if it leaks. Publishing is always done by you, on the site.
Publish your article and share it with your audience
When the draft reads well, press Publish. Your article now appears on the home page with the latest posts, on your profile, and on each topic page you chose. A published post keeps its address, so the link you share today keeps working after you edit. Later edits use the Save changes button.
Changed your mind? You can unpublish a post back to a draft, or delete it. Deleting cannot be undone.
To share it, start with your profile page at /@handle. It shows your name, bio, website, counts of posts, followers and following, a Follow button, a Feed link, and up to 100 published posts. Send people there if you plan to write more.
Every writer also gets an Atom feed at /@handle/feed.xml. For example, Miguel's feed carries his posts. Readers who use a feed reader can subscribe to yours the same way. The whole site's feed is at /feed.xml.
Once your post is live, readers who are signed in can like it and leave comments of up to 1000 characters. Reply to the first few. Then keep track of your work in My posts, which shows Drafts and Published tabs with counts, and Edit, View and Publish or Unpublish on each row.
Frequently asked questions
Can I save my article and finish it later?
Yes. Press Save draft and the post stays private to you until you press Publish. Drafts are never shown to search engines.
What is the difference between a note and an article?
A note is a short post of up to 500 characters with no title. An article has a title, as many ## sections as it needs, and can run up to 60,000 characters.
Can an AI writing tool publish for me?
No. A personal token lets a tool save and edit your drafts only. You open the draft on the site and press Publish yourself.
Can I change my handle after I sign up?
Settings lets you change your name, bio and website, but not your handle, email or password. Choose your handle carefully on the join page.
How many topics can one article have?
Up to five, separated by commas, each under 40 characters. Each one links to a page listing every post on that topic.
Get started: publish your first article on Electrified today
Pick one question you can answer well, write the answer first, add an example and a few follow-up questions, file it under existing topics, and publish. Your first article does not need to be long. It needs to be clear.
Make an account on Electrified: write about your product, topic or idea on your own page, one article at a time, and let readers follow along.
Comments
No comments yet.
Sign in or make an account to comment.