How to Quiz Yourself on a Labeled Diagram of the Heart
A labeled heart diagram looks easy to learn because everything is already named for you. That is the problem. If you want to know how to quiz yourself on a labeled diagram of the heart, you have to hide the labels and force your memory to do the work. This guide gives you five steps that do that, plus a way to use a photo of your own diagram to get practice questions you did not have to write.
When you look at a diagram with the labels showing, your brain recognizes the words. Recognizing is not the same as recalling. On an exam, the labels are gone, or the question asks you to name a valve from a description. You need to produce the answer, not spot it.
Pulling facts out of memory is called active recall, and it is the idea behind quizzing yourself instead of re-reading. If you want a short, practical look at this idea on another kind of page, see these active recall drills for a periodic table page. The same logic applies to the heart.
How to quiz yourself on a labeled diagram of the heart: what to learn first
Do not try to memorize the whole diagram in one go. Split it into four groups and learn them in this order.
- Chambers: right atrium, right ventricle, left atrium, left ventricle.
- Valves: tricuspid, pulmonary, mitral (also called bicuspid), aortic.
- Vessels: superior and inferior vena cava, pulmonary artery, pulmonary veins, aorta.
- Flow: the path blood takes through all of the above.
The first three groups are labels. The fourth is a sequence, and it ties the labels together. Once you can say the sequence, you can rebuild most of the diagram from it.
Step 1: Cover the labels and name every structure
Take your textbook diagram or class handout. Cover the labels with a sheet of paper, or use a copy where they are blank. Point to each structure and say its name before you check.
Keep a tally. Mark each one you got right the first time and each one you missed. Do not re-read the whole diagram after a miss. Just look at that one label, then cover it and try again a minute later.
Pay attention to which side of the diagram is which. Diagrams show the heart as if you are facing the person, so the right side of the heart appears on the left of the page. This trips up almost everyone at first. Say it out loud: "the right atrium is on the left of my page."
Step 2: Redraw the heart from memory
Close the book and draw the heart on blank paper. It does not need to be pretty. Draw four boxes or rounded shapes for the chambers, add the four valves between them, then add the big vessels.
Label as much as you can. Then open the book and compare. Use a different colored pen to fix mistakes and fill gaps. The colored corrections show you exactly what your memory was missing.
A simple color rule helps. Use blue for deoxygenated blood and red for oxygenated blood. Color the right side blue and the left side red. When you redraw, the colors become a second cue.
Step 3: Trace blood flow in order, out loud
Now say the path of blood without looking. A correct version goes like this:
- Blood returns from the body through the vena cava into the right atrium.
- It passes through the tricuspid valve into the right ventricle.
- It passes through the pulmonary valve into the pulmonary artery, which carries it to the lungs.
- Oxygenated blood returns through the pulmonary veins into the left atrium.
- It passes through the mitral valve into the left ventricle.
- It passes through the aortic valve into the aorta and out to the body.
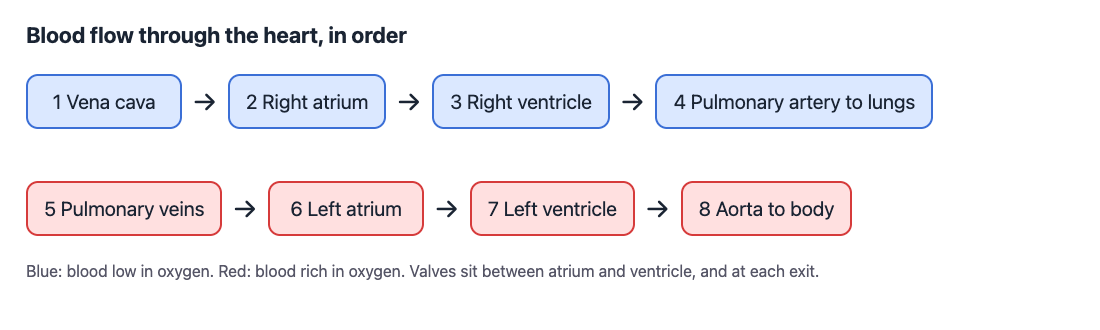
This is a chain of steps, much like a process diagram. If you like the idea of testing yourself on sequences, quizzing yourself on a flowchart from your notes uses the same approach.
If you stall at step four, that tells you something useful. Most students are shaky on the pulmonary veins, because they carry oxygenated blood and that feels backwards. Write that one on a sticky note.
Step 4: Turn each label into a question-and-answer card
Hand-written cards work, but they take time, and you only ask the questions you already think of. You can also let Study Shot write questions from a photo of the diagram.
Here is a workflow that fits a heart page. The steps match the three on the Study Shot home page:
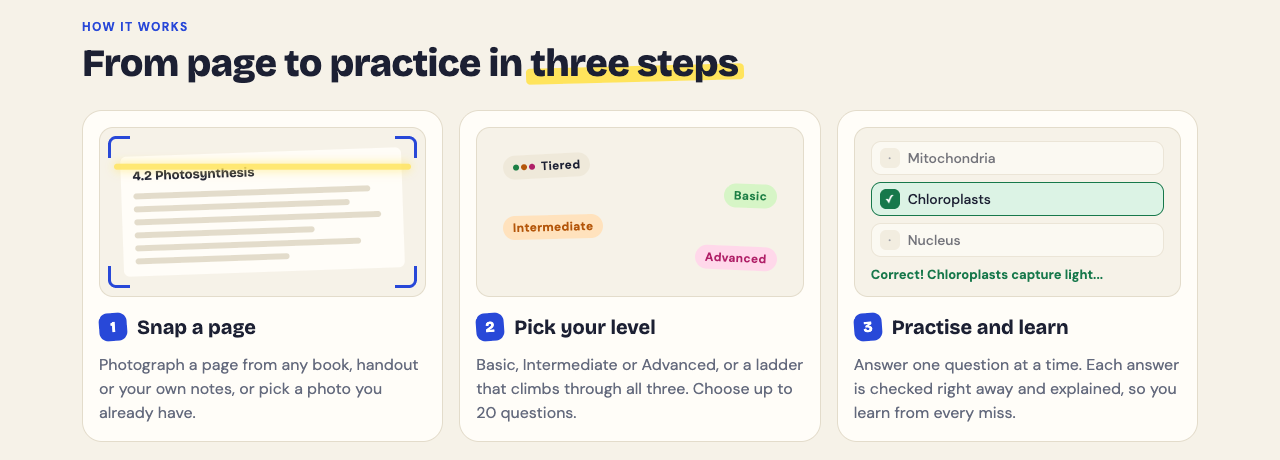
- Open Study Shot in your phone or computer browser and log in.
- Choose Make a new quiz, then Take photo or Choose photo. Hold the page flat and fill the frame. Textbooks, notes, diagrams and whiteboards all work.
- Choose how many questions you want: 5, 10, 15 or 20. The default is 10.
- Choose a level. For a heart diagram, Tiered is a good start. It is a ladder from basic to advanced, and it splits your questions as evenly as it can across the three levels.
- Pick the quiz language, then press Create questions. It can take up to a minute.
The levels line up with how you study a diagram. Basic covers key terms, facts and definitions, such as naming a valve. Intermediate asks you to explain, compare and connect ideas, such as how the tricuspid and mitral valves differ. Advanced asks you to apply and predict in new situations, such as what would happen to blood flow if a valve did not close fully.
Each question has four choices, A to D, with one right answer. You pick one and press Check answer. The app tells you Correct! or Not quite., shows the right answer, and gives a short explanation. Use the Show page button during the quiz to look back at your photo if you want to see where a structure sits.
One honest note: the questions are written by an AI model, and it can make mistakes. Treat the explanation as a way to check your thinking against your textbook. If a question looks wrong, use Report a problem with this question, and pick one of the four reasons.
Study Shot is multiple choice only, so it will not replace Steps 2 and 3. It is the fast way to test recognition under pressure and to find questions you did not think to ask.
There is research on this point. In one study of 350 second-year medical students (Ilyas and colleagues, 2026), students who practiced with short-answer questions scored a mean of about 82 on a later multiple-choice test, against about 71 for students who practiced with multiple-choice questions. The authors concluded that short answers were more effective for retention. It is one study from one school, so treat it as a nudge, not a rule. The practical reading is simple: keep the redrawing and the out-loud tracing, and use the quiz as the extra layer.
Step 5: Space your reviews and mix up the order
One long session feels productive, but the facts fade. Spread your practice over several days instead.
- Day 1: Steps 1 to 3, then a 10 question quiz.
- Day 2: Redraw the heart from memory, then retake the quiz.
- Day 4 or 5: Trace blood flow out loud, then make a new quiz at Intermediate or Advanced from the same photo.
Your quizzes are saved in your library with the page photo and your best score, so retaking is one tap. When you finish, the results screen shows your score for each level and a Look at these again list. That list shows each missed question with your answer and the right answer. Start your next session there.
Mix the order, too. If you always go from the vena cava forward, you may only know the chain, not the individual parts. Start at the aorta and go backward. Start at the mitral valve and say what comes before and after it.
Grades give you a target. Study Shot calls 90% and up Mastered, 70% and up Good, 50% and up Getting there, and anything below 50% Needs another try. If you land in the lower bands, that is information, not failure. How you read a low score matters too, and this post on whether a growth mindset helps you study better covers what the research does and does not show.
Common mistakes when studying heart anatomy
- Mixing up left and right. Remember the diagram is drawn from the patient's point of view.
- Assuming arteries are red and veins are blue. The rule is about direction, not oxygen. Arteries carry blood away from the heart. The pulmonary artery carries deoxygenated blood, and the pulmonary veins carry oxygenated blood.
- Memorizing names without function. Know what each valve prevents, which is backflow.
- Only studying with labels visible. If the labels are on the page, you are re-reading, not recalling.
- Taking a blurry photo. If the page is out of focus or cropped, the questions will suffer. Fill the frame and hold the page flat. If Study Shot cannot write questions for a photo, it says so and asks you to try a different page.
- Trusting every answer without checking. Compare explanations with your textbook, especially for details like the mitral valve's alternate name.
Frequently asked questions
What is the fastest way to memorize the parts of the heart?
Cover the labels, name each structure, then redraw the heart from memory and trace blood flow out loud. Repeat across several days instead of cramming in one sitting.
Can I make a quiz from a photo of my textbook diagram?
Yes. In Study Shot you take or choose a photo of the page, pick the number of questions and a level, and press Create questions. Photos can be JPEG, PNG, WebP or GIF up to 5 MB.
How many questions should I choose for a heart diagram?
Ten is a good start, and it is the default. Choose 15 or 20 when you want more depth across basic, intermediate and advanced levels.
Are the AI-written questions always correct?
No. They can contain mistakes, so use the explanation to check your understanding against your textbook. If a question looks wrong, use Report a problem with this question.
Get started
Find the heart diagram in your textbook or notes, and run through Steps 1 to 3 on paper first. Then photograph the page and let the quiz show you what you missed.
Try Study Shot: it is free to start. Photograph the page you are studying tonight and get 10 practice questions on it, from basic to advanced.
Comments
No comments yet.
Sign in or make an account to comment.