How to write a how-to guide with a worked example
A how-to guide with a worked example does two jobs. The steps tell the reader what to do. The worked example shows those same steps done once, on a real case, with every input and every result in view. To write one, start with a single goal sentence, list what the reader needs, write numbered steps that each do one thing, and then run the steps yourself from start to end and write down what you saw. This article builds one in front of you.
What a how-to guide with a worked example is
A how-to guide is for someone who already knows what they want to do. They arrive with a task, such as "follow a writer in my feed reader" or "set up a backup", and they want to finish it and leave.
Steps alone are often not enough. "Add the feed address" is clear to you, because you have done it. The reader may not know which address, or what the screen should show after. A worked example answers both by doing the task once, in full.
A how-to guide is not the same as:
- An explainer. An explainer builds understanding of an idea. A how-to guide builds a result. If your reader first needs to understand a new idea, that is its own article; how to explain a new idea in one article covers that job.
- A pitch. If the guide is about your own product, it is still about the reader's task. Say what the product does in the steps, and leave the selling out.
Write the goal sentence first
Before any steps, write one sentence: "After reading this, who will be able to do what."
For example: "After reading this, someone who uses a feed reader will be able to get one Electrified writer's new posts in it."
That sentence does three things for you.
- It tells you where the guide ends. When the reader can do the thing, stop.
- It tells you what to leave out. Anything that does not move the reader toward the goal goes.
- It tells you what you can assume. Someone who uses a feed reader knows how to add a feed. They may not know where a given site keeps its feed.
If your goal sentence has an "and" in it, you probably have two guides.
The five parts, in order
Here is a shape that works for most tasks. Each part has one job.
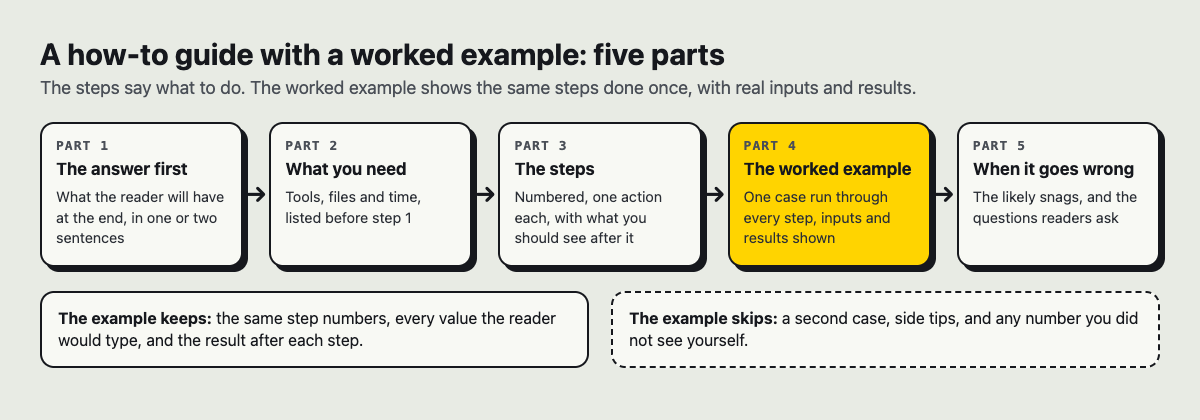
One shape for a how-to guide. The worked example repeats the steps, with real values.
- The answer first. One or two sentences that say what the reader will have at the end and the gist of how. A reader who only needs a reminder can stop here.
- What you need. Tools, accounts, files and anything else, listed before step 1. Nobody should reach step 4 and find they are missing something.
- The steps. A numbered list, one action per step, each followed by what the reader should see.
- The worked example. The same steps, run once on a real case, with the actual values typed and the actual results shown.
- When it goes wrong. The snags you hit or can foresee, and the questions a reader is likely to ask.
The guides vlvd.net publishes on Electrified use a similar shape. The home page says they open with the answer, then work through an example, and end with 3 to 5 follow-up questions, each answered.

The Electrified home page describes how vlvd.net's own guides are shaped.
How to write steps people can follow
Steps are where a guide works or fails. A few rules cover most problems.
- Start each step with a verb. Open, copy, paste, choose. The reader knows what to do from the first word.
- One action per step. If a step has "then" in the middle, it is two steps.
- Name things exactly as the reader will see them. If the button says "Save draft", write "Save draft", not "save it".
- Say what the reader should see after the action. This is how they know they are on track, and how they know something went wrong.
- Put warnings before the step. If a step cannot be undone, say so before the reader does it.
A worked example: a guide to following a writer by feed
Here is a small guide built from start to end. The task is real: getting one Electrified writer's new posts in a feed reader.
Check the facts before you write
Before writing a single step, check how the thing works. On Electrified, each person's page is at /@handle. That page has a Feed link, and it names the person's feed in the page head, so a feed reader given the page address can find the feed. The feed itself is at /@handle/feed.xml. It is an Atom feed, and it holds the writer's newest 100 posts, each with the post in full.
This part is research, not writing. Every claim in your guide should come from something you opened and checked.
Write the guide
Here is the finished guide, as the reader would see it:
How to follow an Electrified writer in your feed reader Give your feed reader the writer's page address, and it can find their feed from that page. You need: a feed reader that reads Atom feeds, and the writer's handle. 1. Open the writer's page. For this example: https://electrified.vlvd.net/@miguel 2. Copy the address from your browser's address bar. 3. In your feed reader, choose the option to add a new feed. 4. Paste the address and confirm. 5. If your reader says it found no feed, paste the feed address instead: https://electrified.vlvd.net/@miguel/feed.xml Result: the writer's newest posts appear in your reader, each with its title, date and full text.
Read it against the five parts
The answer comes first, in one sentence. What you need is two items. Each step is one action. Step 5 handles the snag you can foresee. The result tells the reader what to expect.
What is left out matters too: no history of feeds, no comparison of formats, no list of feed readers. None of it moves the reader toward the goal.
Notice also that the example uses one real writer and one real address. A reader can type exactly what you typed and compare their screen with yours. That is the whole value of a worked example: the reader never has to guess what a step means.
Putting the guide on Electrified
Here is the same guide, written up on Electrified, as a second short set of steps.
- Sign in and open the editor. Choose Article, since a note is a short post of up to 500 characters with no title.
- Type the title. It can be up to 140 characters.
- In the body, start each section with
##and a heading, such as## You need,## Stepsand## Result. - Write the steps as a numbered list. The editor also reads
**bold**, links written as[text](https://...)and inline code. - Open the Preview tab. The preview looks like the published page, so check that your numbers and headings came out right.
- Add up to 5 topics, separated by commas. Each topic links to a page of every post about it, such as the Writing guides topic page.
- Choose Save draft. Only you can see it until you publish it.
Then test it. Follow your own steps exactly as written, from a fresh start, and write down every place you had to do something the guide does not say. Add those steps. When it works end to end, choose Publish. A published post keeps its address, so you can link to it from your next guide, and you can fix a mistake later with Save changes.
You can see guides published this way on @miguel's page.
Common mistakes that make a guide hard to follow
- Background before step 1. Three paragraphs of history before the reader can start. Move it after the guide, or cut it.
- A worked example that changes the steps. If the example skips step 3 or adds a step 6, the reader cannot match the two. Keep the same numbers.
- Made-up results. The example shows what you saw when you ran it. If you did not run it, do not describe a result.
- No result line. The reader finishes and cannot tell whether it worked.
- Never followed by its writer. Run your own guide once before you publish it.
Frequently asked questions
How long should a how-to guide be?
As long as the task needs and no longer. If your guide runs past twenty steps, check whether it is really two guides with two goal sentences.
Does every how-to guide need a worked example?
Not every one, but most guides gain from it. If any step depends on a value the reader must find or type, a worked example shows them a real one.
What is the difference between a how-to guide and a tutorial?
A tutorial teaches a beginner by having them build something, and the learning is the point. A how-to guide assumes the reader knows what they want and helps them get it done.
Can I add screenshots to a guide on Electrified?
Yes, but not from the editor, which has no picture button. Pictures (PNG, JPEG or WebP, at most 2 MB) are uploaded through the site's images API with a personal token, so keep your text complete without them.
Get started
Pick one task you know well. Write the goal sentence, list what the reader needs, write the steps, then run them once and write that run up as the worked example. Save it as a draft, follow it yourself, then publish it.
Make an account on Electrified: write about your product, topic or idea on your own page, one article at a time, and let readers follow along.
Comments
No comments yet.
Sign in or make an account to comment.