How to write a project retrospective article
To write a project retrospective article, start with one idea: you are writing for someone who was not in the room. A team retro is a meeting. A retrospective article is a public record of what you set out to do, what happened and what you learned. This guide gives you a six-part shape, a made-up worked example and an edit pass.
What a project retrospective article is
A project retrospective article looks back at a finished project, or a finished stage of one, and explains it to an outsider. It is not a launch announcement and it is not a status report. It covers the whole arc: the goal, the path, the result and the lessons.
Your readers fall into three groups:
- People about to start a similar project, who want to know where the hard parts were.
- People who follow your work and want the full story, not a snippet.
- Your future self, who may not remember why you made half of these decisions.
Pick one of these readers before you write. A retrospective for people starting a similar project goes deeper on decisions. One for followers can be lighter on setup and heavier on the story. If you want an in-progress format instead, see how to write a project update post people want to read.
Gather your records before you write
Do not write only from memory. Memory can leave gaps, so check what you wrote down at the time. Spend an hour collecting material first.
- Dates. When did you start, when did the plan change, when did you finish? Check your calendar, your project history or your messages.
- The original goal. Find the first written version of what you wanted. If you never wrote one, say so. That is a lesson in itself.
- Decisions. List the three or four forks where you chose one path over another, and why.
- Numbers. Hours spent, cost, size, counts, results. Use only numbers you can point to.
- Setbacks. Write down what broke, what you cut and what you rebuilt.
Put it all in a plain notes file. Messy is fine. You are collecting, not writing.
How to write a project retrospective article in six parts
A retrospective needs a spine, or it turns into a diary. Use these six parts. They work for software, research, events and personal projects.
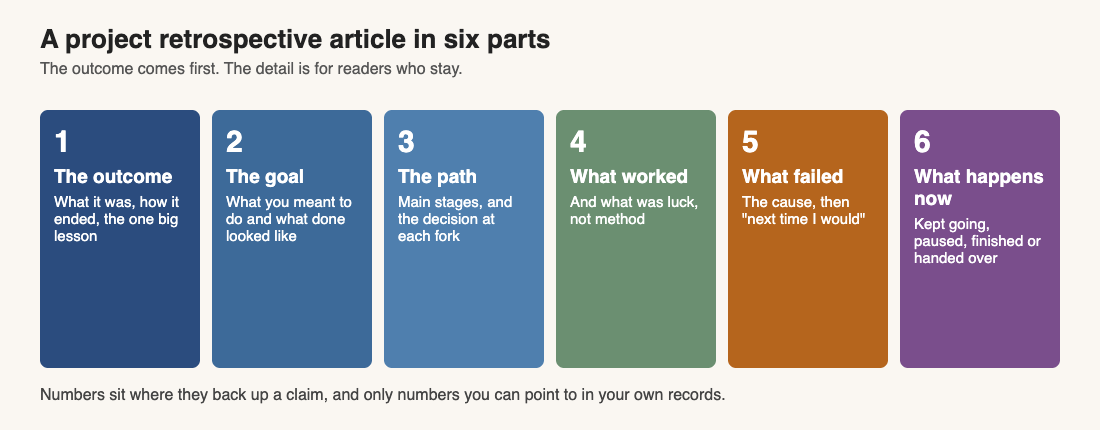
- The outcome. Two or three sentences: what the project was, how it ended and the one big lesson.
- The goal. What you meant to do and what "done" looked like.
- The path. The main stages in order, with the decision at each fork.
- What worked. And which parts were luck, not method.
- What failed. The cause, then what you would do next time.
- What happens now. Kept going, paused, finished or handed over.
Opening with the outcome matters. A reader who leaves after one paragraph should still know how it ended. The detail is for the people who stay.
On Electrified an article has a title of up to 140 characters and as many sections as it needs, and a section starts with ## and a heading. So each of the six parts can be one section of your page.
A worked example: the study schedule tool
Here is an example. The writer, the project and the numbers are made up for this guide, so nothing in it is a real result. Say a writer built a small tool that turns a list of topics and an exam date into a weekly study plan. Their opening could read:
I spent ten weeks building a study schedule tool. It works and I use it every week, but it took twice as long as I planned, because I chose the wrong input format at the start. The main lesson: build the ugly version that handles real input first.
Then the goal, in one paragraph. Be specific about what success meant. "Make a weekly plan from a list of topics and an exam date" is a goal. "Make studying easier" is a wish.
For the path, use short stages, not a day-by-day log:
- Weeks 1 and 2: planned the features and chose a plain text format.
- Weeks 3 to 5: built the scheduler, then found the format could not describe a topic that repeats.
- Weeks 6 to 8: rewrote the input layer.
- Weeks 9 and 10: tried it on a real exam period and fixed the edge cases.
Under each stage, write two or three sentences on what happened and why. Give the decision, not just the event. "I chose a plain text file because it was quick to write" tells the reader something. "I used a text file" does not.
Write honest lessons
This is the part readers came for, and the part where a retrospective most easily goes soft. Three habits keep it honest.
Name the cause, not the symptom
"The project ran late" is a symptom. "I never tried the format on a real semester, so the flaw showed up in week 5" is a cause. Push one level deeper each time.
Separate luck from method
Some things worked because you planned well. Some worked by accident. Say which. If a choice paid off by luck, admit it, so nobody copies it as a method.
End each lesson with an action
Turn every failure into a sentence that starts with "Next time, I would". For the example:
- Next time, I would try the input format on one real example before writing any scheduling code.
- Next time, I would set a cut-off date for new features at the halfway point.
Keep the list short. Three strong lessons beat ten weak ones. If your list is long, group the items and keep each group's headline with your best example.
Add numbers and evidence
A claim with no evidence reads like opinion, so back up the important ones.
- Numbers: "Planned: 5 weeks. Actual: 10 weeks." Use only figures you can verify from your own records, and say where they came from.
- Before and after: a short comparison shows change better than a paragraph of adjectives.
- Links: link to the project page, the notes or the code where a reader can check what you say.
If your project involved money, say what it cost and what came back, plainly. How to explain your pricing in an article covers how to present figures without confusing the reader.
Edit, then end with what happens now
Write the full draft in one pass, then edit in a separate sitting. Check these in order:
- Does the first paragraph give the outcome? If not, rewrite it.
- Is every lesson tied to something that happened? Cut lessons with no story behind them.
- Are the numbers consistent? Make sure dates and totals match all the way through.
- Is there jargon a newcomer would not know? Explain it or remove it.
- Are the sentences short? Split any that run past two lines.
Then write the ending. Say what happens to the project now: kept going, paused, finished or handed over. If you want feedback, ask one specific question. How to write a post asking for feedback on your project shows how. For the last paragraph itself, how to write an article conclusion that sticks has patterns you can reuse.
In the Electrified editor, the body box has Write and Preview tabs, and the preview looks like the published page. Choose Save draft first: a saved draft stays visible only to you until you press Publish, so you can step away and come back with fresh eyes. Add up to five topics, separated by commas, so the article sits on topic pages beside related guides. The Writing guides page is one example.
Frequently asked questions
How long should a project retrospective article be?
Long enough to cover the goal, the path and three or four real lessons. A small project needs fewer words than a large one, and the first paragraph should carry the outcome either way.
Should I write it right after the project ends?
Write your notes right away, while the details are fresh. Write the article a few days later, once you can see what mattered.
Do I have to share failures?
You do not have to share everything. Pick the failures that taught you the most and explain them plainly, since a retrospective with no failures leaves the reader with little to use.
Can I write one for a project that did not succeed?
Yes. State the outcome in the first paragraph, then explain the causes and what you would do differently.
Can I write a series of retrospectives?
Yes. A run of articles on one topic is a way to build knowledge around it. On Electrified they all sit on your own page, and anyone following your feed sees each new one.
Get started
Pick a project you finished, even a small one, and write the first paragraph today: what it was, how it ended and the one lesson. Then fill in the six parts one section at a time.
Make an account on Electrified: write about your product, topic or idea on your own page, one article at a time.
Comments
No comments yet.
Sign in or make an account to comment.