Meeting notes from a call transcript in 6 steps
If you have ever tried to write up a call from memory an hour later, you know how much slips away. This guide shows you how to write meeting notes from a call transcript in 6 steps: record the call, get the transcript, mark it up, pull out what matters, write it in a fixed template, and check it before you send it. The examples use Cheap Recorder, which records a call in Chrome and saves a plain text transcript next to the video on your own computer. The method works with any transcript you have.
Why meeting notes from a call transcript beat memory
Memory keeps the parts of a call that felt important to you. It drops the quiet decision someone made in the last two minutes, the exact date a colleague promised, and the question nobody answered. A transcript keeps all of it, with times, so you can go back and check.
The goal is not to copy the transcript. Nobody wants to read 9,000 words. The goal is a one page summary that someone who missed the call can act on.
Get a clean transcript file from your call recording
Step 1: record the call with the transcript on. Cheap Recorder runs in Google Chrome on macOS, Windows and Linux. The call itself has to be open in a Chrome tab. A typical setup for a Google Meet or Teams call looks like this:
- Open the recorder and press Choose folder... under Where to save. Allow Chrome to edit files in that folder.
- Type a name in Name this recording, for example
Weekly demo. The name is used for the file and its folder. - In the Call audio tile, press Pick the call tab..., choose the Meet or Teams tab, tick Share tab audio (some Chrome versions say Also share tab audio), and press Share.
- Under Options, check that Live transcript is ticked. It is ticked by default. Check the language menu beside it too, because it goes back to its default each time the page opens, and Chrome listens for one language per recording.
- Wear headphones, so the other people's voices do not leak back into your microphone.
- Press Start recording. When the call ends, press Stop and finish.
The step by step guides for recording a Google Meet call and recording a Microsoft Teams call cover the details. Always tell people you are recording, and check whether you need their agreement where you and they are.
One thing to know before the call: if the live transcript was off, a transcript cannot be added to that recording afterwards. Also, while it is on, Chrome sends your microphone audio to Google to turn it into text.
Where the file ends up. Each recording gets its own folder, named with the recording name plus the date and time it began, such as Weekly demo - 2026-09-14 10.30. Inside you will find the MP4 and, if the transcript heard speech, a plain text file called Weekly demo - transcript.txt with the time of each line. The guide to where recordings are saved explains the folder in full.
On the finished card you can also press Transcript to download a .md file with formatting, or Captions .srt for a caption file. Do this while the recorder page is still open, because the card only lasts as long as the page.
Skim the transcript and mark speakers, topics and timestamps
Step 2: fix the speaker names first. On plans that include speaker detection, each transcript line is labelled with the source that was loudest while it was spoken. Your own lines carry your microphone's name. Lines from the other side of the call are labelled Meeting. Everyone on the far end comes from one Chrome tab, so they all share that one label.
Before you read anything else, open the Transcript fold on the recording card. There is one Speaker box per label. Replace your microphone's model name with your own name and press Save captions. The transcript file and caption downloads then start each of your lines with that name.
For the Meeting lines, you will need to tell people apart yourself as you read. Names usually help: people say "thanks, Priya" or "Sam, can you take that?" Write the person's initials in the margin of your copy as you go.
Step 3: skim once and mark topics. Read the file fast, top to bottom, without writing notes yet. Each time the conversation moves to a new subject, jot down the time from that line and a two or three word label. A one hour call might give you something like:
- 00:02 Last week's numbers
- 00:14 Launch date
- 00:31 Hiring for support
- 00:48 Open questions
Tip for next time: during the call you can press M or Add marker when a new topic starts. With the default single MP4 the marker notes show while recording but are not saved, so jot the times down. If you tick Also save every source separately under Options before recording, the markers are written to a markers list in the recording's folder.
Pull out decisions, action items, owners and deadlines
Step 4: read again, one topic at a time, and hunt for four things. This is the step that turns a transcript into notes. For each topic block, look for:
- Decisions. Phrases like "let's go with", "agreed", "we'll do", "final answer".
- Action items. "I'll send", "can you check", "someone needs to".
- Owners. The person who said "I'll" or was named in "can you".
- Deadlines. Days, dates, "by Friday", "before the launch".
Copy each one into a scratch list with its time. For example, if the transcript shows Sam saying at 14:20 that he will confirm the venue by Thursday, your scratch line is: 14:20 Sam confirms venue, Thursday.
Watch for action items with no owner. "We should update the pricing page" is not a task until someone has it. Put these in a separate list called "Needs an owner" so they get raised, not lost.
Write the meeting notes using a simple template
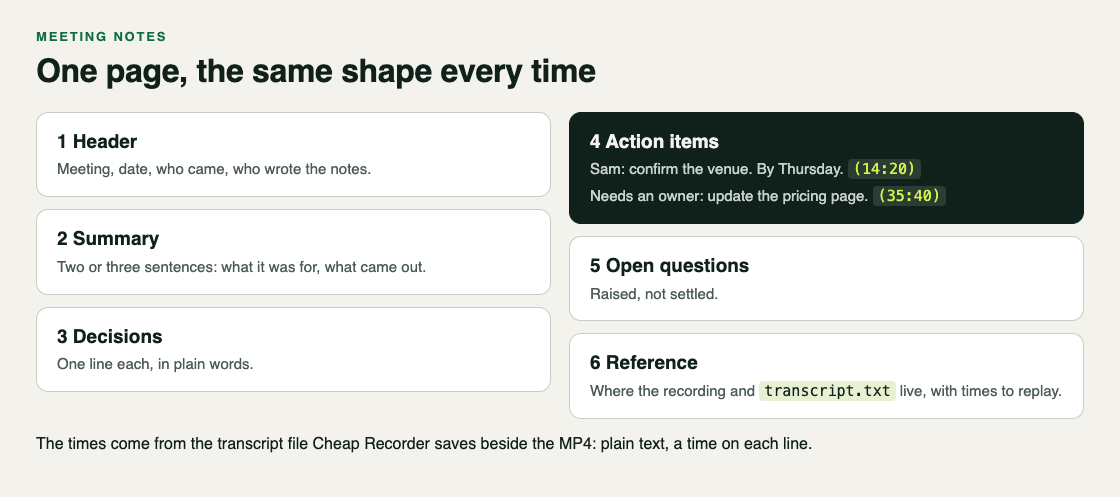
Step 5: fill in the same template every time. A fixed shape makes notes faster to write and faster to read. Use this one:
- Header: meeting name, date, who attended, who wrote the notes.
- Summary: two or three sentences. What was the meeting for, and what came out of it.
- Decisions: one line each, in plain words.
- Action items: owner, task, deadline. One per line.
- Open questions: things raised but not settled, plus your "Needs an owner" list.
- Reference: where the recording and transcript live, with times for anything someone may want to replay.
A filled in action items section might read:
- Sam: confirm the venue. By Thursday. (14:20)
- Priya: send the updated budget to finance. By Monday. (22:05)
- Needs an owner: update the pricing page before launch. (35:40)
Keep the times in brackets. They cost nothing and let anyone jump straight to the moment in the recording if a task is disputed.
Check the notes against the recording and share them
Step 6: verify, then send. Speech recognition makes mistakes, especially with names, numbers and product terms. Before you share anything, check every decision and every deadline against the recording itself, not just the text. Open the MP4 from the recording's folder, skip to the time you noted, and listen to the sentence. It is a normal MP4 file and plays in any player, with no internet needed.
Pay extra attention to:
- Dates and amounts. "Fifteen" and "fifty" are easy to mix up.
- Names of people and products.
- Any line where the transcript reads oddly or seems to skip a sentence. A quiet or mumbled phrase may not have been written down at all.
Then send the notes within a day, while people still remember the call, and ask for corrections. A transcript file is a full record of what everyone said, so think about who should see it.
Cheap Recorder also has an AI button. It sends the transcript only when you press it, so nothing leaves your computer that way unless you choose to.
Frequently asked questions
What file formats work best for call transcripts?
Plain text with a time on each line is the easiest to read and search, and that is what Cheap Recorder saves in the recording's folder. The .md download from the Transcript button adds formatting, and the .srt caption file is better suited to subtitles than to notes.
How long should meeting notes from a one-hour call be?
Aim for one page. A short summary, a handful of decisions and a clear action list are enough; anyone who needs more can follow the times back to the recording.
What if the recording cut out partway through the call?
If a microphone disconnects, its sound ends at that point, and if the call tab share ends, the other side is silent from then on. Write notes for the part you have, mark the gap clearly, and ask attendees to fill it in. This post explains what the file keeps when a microphone drops out.
Get started
The Free plan includes recording, the live transcript and captions, with 12 hours of recording a month on one device. Your recordings and transcript files are saved to a folder you pick on your own computer, and if you ever cancel a paid plan you keep everything, because the files are already on your disk. For more on the transcript itself, read the live transcript and captions guide.
The free plan needs no card. Try Cheap Recorder in Chrome, and your recordings stay on your own disk.
Comments
No comments yet.
Sign in or make an account to comment.