Microphone dropped out mid-recording? What the file keeps
If your microphone dropped out mid-recording, the take is not lost. In Cheap Recorder, the recording is written to your folder every second while you record. But that microphone's sound ends where it dropped, and the rest of the file runs on without your voice. This post explains what you will find in the folder, how to spot the gap, and how to keep it from happening again.
Microphone dropped out mid-recording? The short answer
The recording keeps going. Your screen, your webcam and the other side of a call (if you picked one) carry on to the end. Only the microphone that disconnected goes quiet, from the second it dropped.
While you record, Cheap Recorder tells you when this happens. A message names the microphone, and in the Microphone tile its name is followed by dropped out. That is your cue to decide right away: stop and record again, or finish the take and fix it later.
What the file keeps when the mic disconnects
Cheap Recorder saves to a folder you choose on your own computer, one folder per recording, named with the recording name and the date and time it began. It writes to that folder every second while you record. A dropout does not end the recording: when you press Stop and finish, the file runs to the end, with that microphone silent from the point it dropped.
Here is what that looks like in practice. Say you are recording a 20-minute lesson called Lesson 03 with a USB microphone, and the cable gets knocked at minute 12. You will have:
- Minutes 0 to 12: screen, webcam and your voice, all normal.
- Minutes 12 to 20: screen and webcam still recorded, but no sound from that microphone.
- A call, if you were on one: the other people's voices come from the Chrome tab you picked with Pick the call tab..., not from your microphone, so they keep recording.
The live transcript is made from your microphone's sound, so expect no lines of yours after the point it dropped.
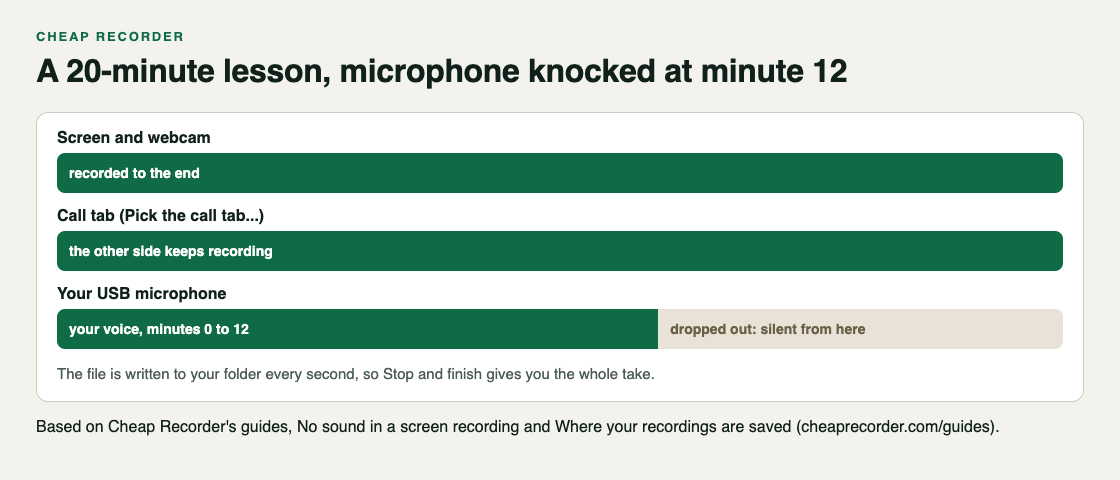
If you ticked Also save every source separately under Options before you started, each ticked microphone also gets its own file next to the mix, named after the microphone and starting with audio_. That matters when you record with more than one microphone. If only one of them drops, the others keep their own clean files to the end.
Why a microphone drops out during a recording
A dropout means the computer lost the microphone. The usual causes are physical:
- A loose or knocked USB cable, or a hub that cuts power for a moment.
- A Bluetooth headset losing its connection, running out of battery, or wandering out of range.
- Unplugging a headset to switch to speakers, forgetting it was your microphone.
Bluetooth deserves its own warning. In Change or add microphones, every microphone shows wired or bluetooth beside its name. If you pick a Bluetooth one, you will see the note Bluetooth microphone selected. That is a warning, not a fault, but read it. On a Mac, a Bluetooth headset used as a microphone also switches into a low-quality mode, so your voice sounds thin, like an old phone line, even when it stays connected. Use the headset to listen and a wired or USB microphone for your voice.
Not every silence is a dropout. If a microphone's level bar stays still while you talk and its name has no dropped out after it, check the microphone's own mute switch and your computer's sound settings. The no sound in screen recording guide walks through those cases.
And if the whole recording ended rather than just the voice, that is a different problem. See screen recording stopped by itself for what ends a recording early.
How to check your recording for silent gaps
You do not need editing software to find the gap. Use what Cheap Recorder gives you after Stop and finish:
- Play it on the card. The finished recording appears on the page with a player. Skip through it and listen for where your voice stops.
- Read the transcript. If Live transcript was ticked, open the transcript and look at the times. A long stretch with no lines from you, while you know you were talking, points to where the microphone went.
- Look in the folder. The recording is an ordinary MP4 (or an M4A if you recorded sound only). Open it in any player. The where recordings are saved guide lists what each folder holds.
- Check the separate files. If you saved every source separately, open each
audio_file on its own. The one that goes quiet early is the microphone that dropped.
One tip for next time: press M or Add marker the moment you see a dropout warning. A short note confirms the time. Be aware that with the default single MP4, those marker notes show while recording but are not saved, so jot the time down yourself. With Also save every source separately ticked, markers are written to a markers list and a chapters file in the folder.
Saving the take: trim, re-record or patch the audio
You have three practical choices. Which one fits depends on where the dropout landed.
Re-record from the dropout
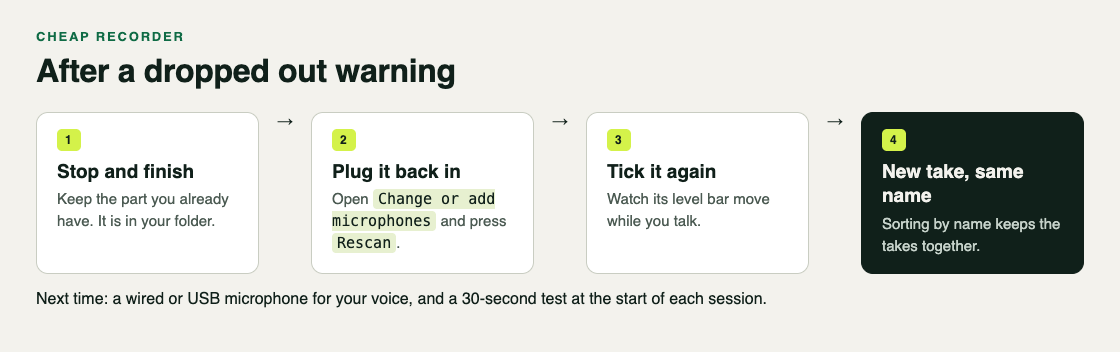
Often the fastest fix. Plug the microphone back in, open Change or add microphones, press Rescan, and tick it again. Then start a new recording that picks up where your voice stopped.
Give it the same name, such as Lesson 03. Each folder is named with the recording name plus the date and time it began, so sorting your folder by name groups the takes together. If you start a second recording with the same name in the same minute, it gets (2) on the end.
Re-record the whole thing
If the dropout came early, or your voice was thin before it dropped because of Bluetooth, start over. A clean single take is easier than stitching.
Patch the audio in your own editor
Joining takes, or laying new voice over the silent stretch, happens in the video editor you already use. Two things help:
- Convert can turn a recording into WAV, MP3 or M4A, which is handy if you re-record just the narration as a sound-only take and want to drop it into an editor. Convert sends the file to the Cheap Recorder server and back; the server deletes its copy when it finishes, and your original is never changed. See the convert recording formats guide.
- For a sound-only patch, switch off Record my webcam and do not pick a screen. The recorder saves an M4A audio file you can line up in your editor.
Cutting words from the transcript will not fill a gap. It removes words; it cannot add back speech that was never recorded.
How to stop mic dropouts on your next recording
- Use a wired or USB microphone. Keep Bluetooth for listening.
- Secure the cable. Route it where your hands and chair will not catch it.
- Record a 30-second test at the start of a session and play it back. It catches the wrong microphone or a muted one before the real take.
- Watch the level bar. Each ticked microphone has a bar that moves with its sound while you record. If it freezes, look at the tile.
- Tick a backup microphone. If your plan records more than one microphone at once, tick a second one and turn on Also save every source separately. If one drops, the other's file still has your voice. If you tick more than your plan allows, the note beside Start recording says this plan allows N microphone(s); start recording greyed out explains each note.
Recording with several people? The podcast separate tracks guide covers one microphone per person on the same computer.
Frequently asked questions
Is my recording lost if the microphone disconnects?
No. Cheap Recorder writes the recording to your folder every second and keeps recording the screen, webcam and any call tab. Only the dropped microphone's sound ends at that point.
How do I know the microphone dropped out while recording?
A message names the microphone, and its name in the Microphone tile is followed by dropped out.
Does a lost internet connection cause the same gap?
No. If the connection drops during a recording, the recording keeps writing to your folder; the plan label says server unreachable. The live transcript does need a connection, so see screen recording without internet for what works offline.
Can Cheap Recorder fill in the missing audio?
No. It cannot recreate speech that was not recorded. Record a new take or a sound-only patch and join them in your own video editor.
Get started
Cheap Recorder runs in Google Chrome on macOS, Windows and Linux and saves every recording to a folder you choose. The Free plan includes recording, the live transcript and captions, with 12 hours of recording a month.
The free plan needs no card. Try Cheap Recorder in Chrome, and your recordings stay on your own disk.
Comments
No comments yet.
Sign in or make an account to comment.