Record a course lesson by lesson so every video matches
If you record a course lesson by lesson, the lessons drift apart unless you make one set of choices and repeat them. Fix the microphone, the camera spot, the shared window, the file names and a short routine for each session, and stop changing them halfway through. This guide shows how to do that with Cheap Recorder in Chrome, with a checklist you can run from lesson 1 to lesson 20.
Why lessons drift apart when you record a course lesson by lesson
Nobody records a whole course in one afternoon. Lesson 3 is on a Tuesday, lesson 4 the next week, lesson 5 after a laptop update. Each session brings a small change. The camera sits a little higher. A different microphone gets picked because a headset was plugged in. The shared window is wider. The transcript language is wrong because nobody checked.
Each change is minor. Put twelve lessons in a row, though, and students notice the jumps in sound, framing and naming. The fix is not more editing. It is one setup and one short checklist, every time.
Set it up once: microphone, camera and shared window
Microphone. Open Change or add microphones and tick the one you speak into. Each microphone is marked wired or bluetooth, and the recorder remembers your choice in this browser. If you see Bluetooth microphone selected, read the note under it and consider a wired microphone for lessons.
Then decide on Record the microphone untouched, under Options, and never change it mid course. By default Chrome cleans up echo, noise and volume; the box turns that off, which suits a good studio microphone. Switching between the two halfway through is one of the easiest ways to make lessons sound different.
Camera. The Layout menu in the Preview heading offers Picture in picture, bottom right (the default), Side by side, Screen only and Camera only; which ones you have is listed under What you can do on this plan. In picture in picture, drag the camera where it covers nothing important and set the Size slider, from 12% to 50% of the picture's width. The preview is the recording, so what you see is what the file holds.
Chrome keeps the position and size for next time. That is your consistency tool: set it once and leave it. Picking a different layout starts the camera from that layout's own corner again, so if you switch for one lesson, put it back. If you use Blur or a background picture, set it before Start recording and check the preview. The screen and webcam guide has every camera option, and placing and sizing the webcam goes deeper.
Shared window. Under What to capture, choose A window or A browser tab rather than Whole screen. One window keeps other apps, tabs and private things out of the file, and the frame keeps the same shape every session as long as you do not resize that window.
What Chrome remembers and what you set every time
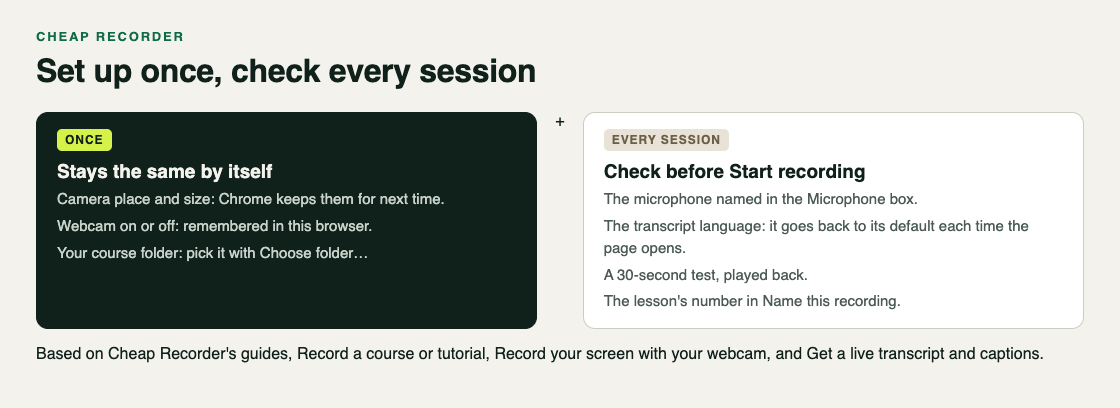
Cheap Recorder has no preset file, but some of your setup is remembered in this browser: your microphone, whether the webcam is on or off, and the camera's position and size. Two things are not, and you set them every session:
- The folder. Under Where to save, press Choose folder... The recorder asks each visit, though Chrome's picker normally reopens where you were.
- The transcript language. The language menu goes back to its default each time the recorder page opens. Check it before every recording.
Name every lesson so the files stay in order
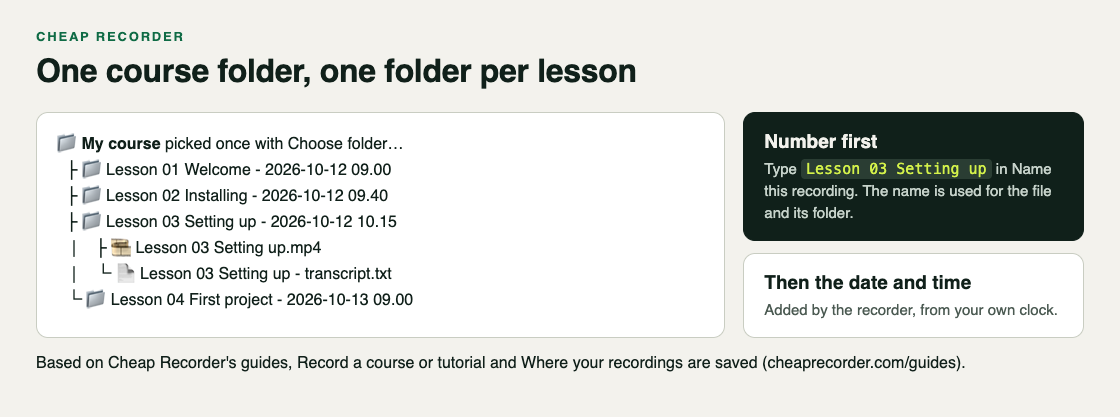
Name this recording is your template. Type Lesson 03 Setting up. The name becomes the file and its folder, and the folder also gets the date and time the recording began, for example Lesson 03 Setting up - 2026-10-14 09.15. Use two digits so Lesson 10 sorts after Lesson 09. A retake in the same minute gets (2) on the end, and sorting by name keeps every take of a lesson together. Where recordings are saved shows the whole folder.
Give each lesson the same shape, too: one line on what it covers, the walkthrough in sections, then a short recap and what comes next. Press M or Add marker at the start of each section; a short note confirms the time. Markers are saved to files only when Also save every source separately is ticked under Options. With the default single MP4 you see the note but nothing is kept, so jot the times down. Markers are not added while you are typing in a text box. Chapter markers as you record covers them in full.
The checklist for every session
Run this at the start of every session. It takes two minutes.
- Close tabs and apps you do not need, and silence notifications.
- Press Choose folder... and pick your course folder.
- Check the microphone tick and the Record the microphone untouched box.
- Check the transcript language.
- Pick the same window or tab under What to capture.
- Look at the preview: layout, camera place and size, background.
- Type the lesson name, for example
Lesson 07 Exporting. - Record a 30-second test and play it back. It catches a wrong microphone or a muted tab.
- Read the note beside Start recording. It reads ready to record when it can start, or gives one reason at a time.
During the take, use Stop and finish, not Chrome's own Stop sharing bar, which also finishes the recording. Keep an eye on your monthly minutes under your name in the top right: if they run out, the recording stops. What ends a recording early covers both.
Keep the sound the same from lesson to lesson
While recording, each ticked microphone has a level bar that moves with its sound. Sit the same distance from the microphone each time and glance at the bar during your opening line. If it moves much less than last week, something changed; stop and compare with your 30-second test.
If you play sound from a demo, choose A browser tab and tick the tab-audio option in Chrome's sharing window. A shared window gives no sound, and on a Mac a whole-screen share has none either.
Write your opening and closing lines once and read them the same way every lesson. Students then hear a series, not a pile of videos.
Finish every lesson the same way
After Stop and finish, the card offers Download MP4 and, with Live transcript on, Captions .srt and Transcript. The MP4 is H.264 video with AAC sound, so it plays almost anywhere. Caption files are not saved in the folder, so download the .srt from the card while the page is open, then add it to your course platform or to YouTube.
If you want cut videos with chapters, decide before lesson 1 and keep it for every lesson. Tick Also save every source separately, mark words in the transcript, press Apply edits and rewrite files, then run bash finalise.sh in the Separate sources folder with ffmpeg installed. It writes demo.mp4 with your markers as chapters. In a normal one-file recording, transcript cuts change the captions, not the MP4, so mixing the two routes gives an uneven course.
Frequently asked questions
How do I match the sound between lessons recorded on different days?
Use the same wired or USB microphone, keep Record the microphone untouched set the same way, and sit the same distance away. Record a 30-second test each session and compare it with the last lesson.
Should I record the whole course in one sitting?
Lesson by lesson is easier to redo and to name, since each lesson gets its own file and folder. A long sitting works too, because a running recording counts as activity and does not sign you out.
How do I keep the picture the same shape in every lesson?
Share the same window or tab every time and do not resize it between sessions. Keep the same layout and camera size, which Chrome remembers for you.
How do I fix a mistake without redoing a lesson?
With every source saved separately, cut the words in the transcript, press Apply edits and rewrite files and run bash finalise.sh. In a normal single MP4, re-record the lesson under the same name; the retake gets its own folder beside the first.
Get started
The Free plan gives you 12 hours of recording a month with live transcript and captions, enough to test your setup and record your first lessons. For a longer course, Creator is $12 a month, or $4.99 a month billed yearly, with 80 hours a month, green screen and layouts, and 4K export. Your files stay in your own folder either way.
The free plan needs no card. Try Cheap Recorder in Chrome, and your recordings stay on your own disk.
Comments
No comments yet.
Sign in or make an account to comment.