Record a remote podcast guest from a call in Chrome
You can record a remote podcast guest from a call in Chrome without a studio app, a second computer or any software to install. Cheap Recorder runs in Google Chrome on macOS, Windows and Linux. It takes your microphone and the sound of the call tab where your guest is talking, and saves them to a folder on your own computer. This guide walks through one full interview, from setup to the files you hand to your editor.
Why record a remote podcast guest straight from a Chrome call
Your guest is already on a call with you. Usually that is a Google Meet or Microsoft Teams tab in Chrome. Recording from that tab means the guest does not have to install anything, create an account or learn a new tool. They join the call the way they always do.
On your side, three things matter for a podcast:
- The files stay with you. Recordings are written to a folder you pick, every second while you record. They are not uploaded, unless you use Convert, which sends a file to the Cheap Recorder server and back.
- Your voice and the guest can be kept apart. With one option ticked, you get a separate file for your microphone and a separate file for the other side of the call, next to the mixed recording.
- You get a transcript. It is useful for show notes, quotes and finding the moment someone said something good.
What you need before the guest joins: browser, mic, headphones and consent
Get these four things right before the call starts. Fixing them mid-interview is much harder.
Google Chrome
Cheap Recorder only runs in Chrome, and the call has to be open in a Chrome tab for its sound to be captured. If your guest's voice comes out of a desktop app, it cannot be picked up this way. Open the call in the browser instead.
A wired or USB microphone
Avoid a Bluetooth headset as your microphone. On a Mac, a Bluetooth headset used as a microphone drops into a low-quality mode, so your voice sounds thin, like an old phone line. Use the headset to listen if you like, and speak into a wired or USB microphone. In the Microphone tile, open Change or add microphones. Each microphone shows wired or bluetooth beside its name, so you can tell at a glance.
Headphones
Wear headphones. Without them, your guest's voice comes out of your speakers and back into your microphone, and you get echo or the guest twice in the file. Ask your guest to wear them too.
Consent
Recording a call may need everyone's agreement, depending on where you and your guest are. Always tell your guest you are recording. A simple habit: say it out loud on the recording at the start, and let them answer.
Set up the call tab so Chrome captures your guest's audio
Open the recorder in one Chrome tab and your call in another. Then set up the recorder in this order:
- Choose a folder. Under Where to save, press Choose folder..., pick a folder and allow Chrome to edit files there. Start recording stays greyed out until you do this. The recorder does not remember the folder between visits, so you choose it each time.
- Name the recording. Type something like
Episode 14 Priyain Name this recording. The name is used for the file and its folder, so numbering keeps episodes in order. - Pick the call tab. In the Call audio tile, press Pick the call tab.... Chrome's sharing window opens. Choose your Google Meet or Teams tab, tick Share tab audio (some Chrome versions say Also share tab audio), and press Share. Only the tab's sound is kept.
For a sound-only podcast, switch Record my webcam off and do not pick a screen. For a video podcast, leave the webcam on.
One trap: if you also film the call tab under What to capture with tab audio ticked there, the guest's voice goes into the file twice. Tick tab audio in one place only, and use Pick the call tab... for the sound. The Google Meet guide shows the sharing window step by step.
Record your microphone and the guest's tab audio together
By default, your microphone and the call are mixed into one recording. That mix is fine for a quick listen. For a podcast you will edit, you want the two voices apart.
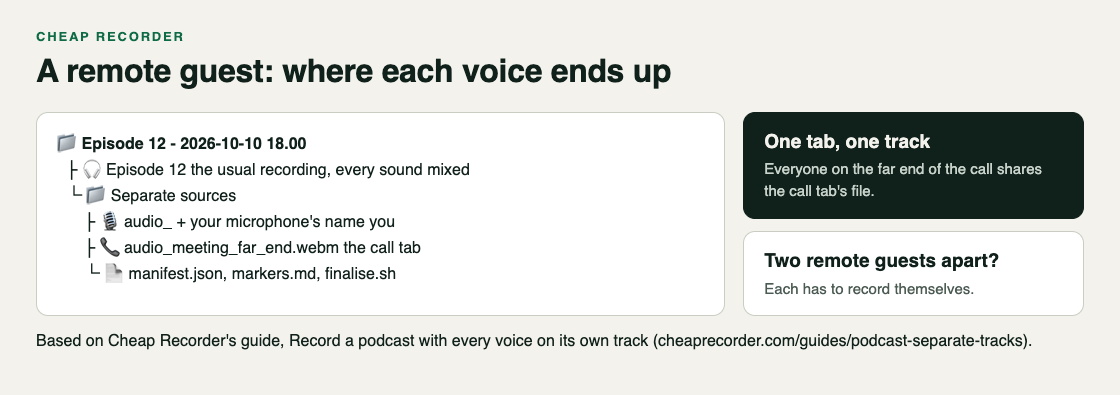
Under Options, tick Also save every source separately before you press Start recording. It cannot be added afterwards. You still get the usual mixed file, plus a folder called Separate sources inside the recording's folder with:
- one audio file per ticked microphone, named after it and starting with
audio_ audio_meeting_far_end.webm, which is your guest- helper files, including
manifest.json,markers.mdandfinalise.sh
Separate files take more room than a single file, so pick a folder on a disk with plenty of space. Everyone on the far end of the call comes from one Chrome tab, so two remote guests share one track; to keep them apart, each has to record themselves. If you have a co-host in the same room, give them their own microphone plugged into the same computer, with headphones. The separate tracks guide covers that setup.
Leave Live transcript ticked if you want a transcript. Pick the language from the menu beside it before you start. The menu resets each time the page opens, so check it every time. While it is on, Chrome sends your microphone audio to Google to turn it into text. If the recording must not leave your computer in any form, untick it.
Run the interview: levels, echo, dropouts and backup recordings
Do a test first
Before an important interview, do a one-minute test call with a friend and play it back. Check that you hear both voices with no echo, and that the Separate sources folder has your audio_ file and the far end's file.
Watch the level bars
While recording, each ticked microphone has a level bar that moves with its sound. If yours stays still while you talk, check the microphone's own mute switch and your computer's sound settings.
Mark the good moments
Press M or Add marker when your guest tells a great story or when you move to a new topic. A short note confirms the time. With Also save every source separately ticked, these are written to a markers list and a chapters file. With the default single file, the notes show but are not saved, so jot the times down.
Know what a dropout looks like
- The guest goes silent. If the tab share ends, you see Meeting audio sharing stopped. and the guest is silent in the file from then on. Picking the tab again does not add it to a running recording. Stop and start a new recording, then pick the tab again. Keep the call tab open the whole time.
- Your microphone disconnects. Its name shows with dropped out, and its sound ends at that point.
- Your internet drops. The recording keeps writing to your folder every second. A new recording needs the connection back before it can start.
- Never press Chrome's own Stop sharing bar. It finishes the recording. Use Stop and finish.
Export, check and edit the recording after the call
Press Stop and finish. The recording appears with a player and is already in your folder. Listen to the start, a bit of the middle and the end before you close anything.
Captions and transcript downloads appear on the card if the transcript caught speech. The card only lasts while the recorder page is open, so do your downloads before closing the tab. The originals stay in your folder either way.
If you saved every source separately, open the Separate sources folder and run bash finalise.sh on a computer with ffmpeg installed. It makes a finished demo.mp4, applies any transcript cuts and turns each microphone's file into a WAV. Your guest's track is the audio_meeting_far_end.webm file.
In the Transcript fold, rename the Speaker boxes so lines read Priya: ... instead of a device name, then press Save captions (or Apply edits and rewrite files when every source is saved separately). On plans that include it, Remove filler words marks ums and ahs for cutting. The transcript also makes a fast start on show notes, much like turning a call transcript into meeting notes.
Frequently asked questions
Can I record a podcast guest in Chrome without installing software?
Yes. Cheap Recorder runs in Google Chrome on macOS, Windows and Linux with nothing to install, and your guest only needs to join the call as usual. Optional extras like finalise.sh need ffmpeg on your computer.
Why is my guest's audio missing or quiet in the recording?
The most common cause is that Share tab audio was not ticked in Chrome's sharing window, or the tab share ended mid-recording. The call must also be in a Chrome tab, not a desktop app.
Should I turn off noise suppression when recording a podcast call?
For calls, leave Record the microphone untouched unticked, so Chrome keeps cleaning up echo, noise and volume on your microphone, and wear headphones. Ticking it suits a studio microphone in a quiet room. Read more in when to turn off clean-up.
Get started
The free plan includes recording, live transcript and captions, and 12 hours of recording a month on one device. That is enough to record a full episode and test your setup with a friend first.
The free plan needs no card. Try Cheap Recorder in Chrome, and your recordings stay on your own disk.
Comments
No comments yet.
Sign in or make an account to comment.