Record the microphone untouched: when to turn off clean-up
Your microphone does not reach the file the way it leaves your mouth. By default, Chrome cleans up the sound first: it removes echo, filters noise and evens out the volume. Usually that helps. Sometimes it makes a good microphone sound worse. This guide shows when to record the microphone untouched, when to keep the clean-up on, and how to test which suits your setup before you record anything that matters.
What recording the microphone untouched actually means
In Cheap Recorder there is a tick box under Options called Record the microphone untouched. When you tick it, the recorder asks Chrome to turn off its echo, noise and volume correction. Your voice goes into the file as the microphone hears it.
When you leave it unticked, which is the default, Chrome processes the sound before it reaches the file, so what you hear back is the processed version.
That is the whole trade. Untouched audio is honest. It keeps everything good about your microphone and your room, and everything bad about them too. Processed audio is safer when the room or the microphone is poor, but it can damage a clean signal.
The three kinds of clean-up Chrome applies
Three kinds of processing are in play when the box is unticked.
- Noise suppression listens for steady background sound, such as a fan, a hum or traffic, and tries to push it down. It has to guess what is voice and what is noise.
- Echo cancellation tries to remove sound that came out of your speakers and back into your microphone. This matters on calls, where the other people's voices would otherwise loop back to them.
- Automatic volume correction, often called auto gain, raises quiet passages and lowers loud ones so your level stays roughly even.
Chrome does all three by default, and the one box turns them all off together.
Signs the clean-up is hurting your recording
Record 30 seconds and play it back with headphones. Listen for these:
- Pumping volume. Your voice swells up and sinks back down, or the room noise rises in every pause and drops when you speak. That is volume correction chasing your level.
- A very quiet voice on a studio microphone. Volume correction can misjudge a microphone that already has a strong, clean signal.
- A warbly or watery voice. Noise suppression and echo cancellation can mistake parts of your voice for something to remove, which leaves a slightly underwater sound.
- Clipped word endings. Soft sounds at the end of words, like a trailing "s" or a breath, get cut short because the filter decided they were noise.
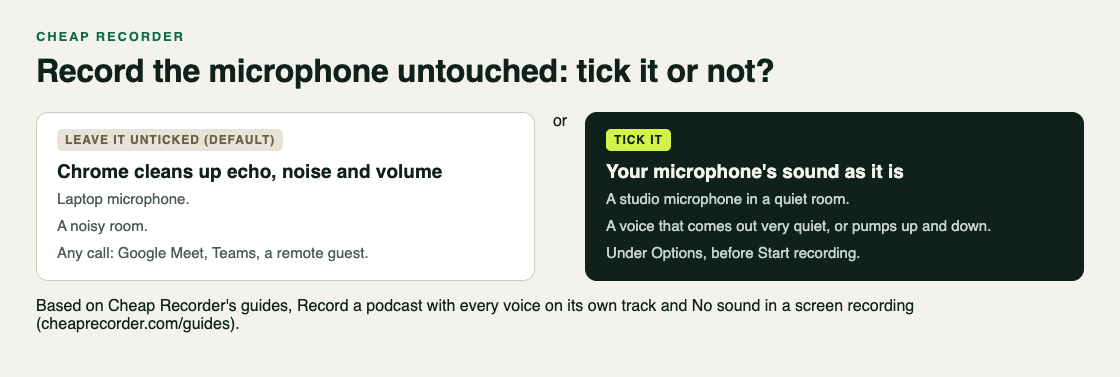
The Cheap Recorder podcast guide notes that a voice which is very quiet or pumps up and down on a studio microphone is helped by ticking Record the microphone untouched. If you hear any of these signs with a decent microphone in a quiet room, that is your cue.
Record the microphone untouched: when to turn off clean-up
Tick the box when most of these are true:
- You have a good microphone. A USB or studio microphone close to your mouth gives a strong signal that does not need rescuing.
- The room is quiet. No fan, no open window, no one talking in the next room. Untouched means the room is recorded too.
- You wear headphones. With nothing coming out of speakers, there is no echo to cancel.
- You plan to edit the sound later. If you will clean it up in an audio editor, you want the raw signal to start from, not one that has already been squeezed.
A narrated lesson recorded at a desk with a USB microphone and headphones is the classic case.
When to leave clean-up on: laptop mic, open speakers, noisy room, live calls
Leave the box unticked when any of these apply:
- You use a laptop's built-in microphone. It sits far from your mouth and close to the keyboard and fan, so it needs the help.
- Sound comes out of open speakers. Without echo cancellation, whatever plays from the speakers goes straight back into your microphone.
- The room is noisy. Untouched audio will faithfully keep every bit of that noise.
- You are recording a live call. The Google Meet and Teams guides say to leave Record the microphone untouched unticked for calls, and to wear headphones as well. Headphones stop the other people's voices coming out of your speakers and back into your microphone.
If you hear echo or voices twice on a call, do not just tick the box. Put headphones on first, keep clean-up on, and check that you have not shared the call's sound in two places. The no sound in screen recording guide covers that case.
One more warning. On a Mac, a Bluetooth headset used as a microphone switches into a low-quality mode, so your voice sounds thin, like an old phone line. Turning clean-up off will not fix that. Use the headset to listen and a wired or USB microphone for your voice.
How to record untouched audio in Cheap Recorder and check the result
Here is a test you can run in a few minutes.
- Open the recorder in Chrome. Under Where to save, press Choose folder... and allow Chrome to edit files there. Start recording stays greyed out until you do, and the note beside it says choose a folder first.
- Open Change or add microphones and tick the microphone you speak into. Each one shows wired or bluetooth beside its name. Press Rescan if you just plugged it in.
- For a quick sound check, switch off Record my webcam and do not pick a screen. The recording is then an M4A audio file, which makes it easy to judge your microphone on its own.
- Type a name in Name this recording, for example
Mic test processed. Leave Record the microphone untouched unticked. - Press Start recording and read the same 30 seconds of text you will use in the real thing. Include a quiet sentence, a loud sentence and a pause. Watch the level bar move as you talk. If it stays still, check the microphone's own mute switch and the computer's sound settings.
- Press Stop and finish. The file is already in your folder.
- Now tick Record the microphone untouched, rename the recording to
Mic test untouched, and record the same text again. - Play both files back with headphones. Compare the pauses, the endings of words and how steady your level sounds.
Because each recording gets its own folder named with the name you typed plus the date and time, sorting your save folder by name puts the two tests side by side.
If you record with more than one microphone, tick Also save every source separately under Options. Each ticked microphone then gets its own file next to the mix, named after it and starting with audio_. That lets you judge each voice on its own. The podcast separate tracks guide explains the setup.
Frequently asked questions
Does turning off noise suppression make my recording louder?
Not by itself. It turns off volume correction, so your level is whatever your microphone gives. On a studio microphone whose voice came out very quiet, that is often the fix.
Can I clean up raw microphone audio after recording?
Yes, in your own audio editor. You can convert a recording to WAV (16-bit, 48 kHz) from the card, and with every source saved separately, running bash finalise.sh turns each microphone's file into a WAV. See the convert guide for the steps.
What happens if my microphone drops out mid-recording?
A message names the microphone followed by dropped out, and its sound ends at that point in the file. This is separate from the clean-up setting. Read what the file keeps when a microphone drops out for the details.
Keep every lesson sounding the same with consistent mic settings
If you record a series, switching between processed and untouched audio from one video to the next is easy to hear. Pick one setting for the whole series, write it down, and use the same microphone, the same room and the same distance from your mouth each time.
Start each session with a 30-second test and play it back. That catches a wrong microphone or a muted tab before you lose a full take. The course and tutorial guide covers this habit, and recording a course lesson by lesson so every video matches goes further into keeping a series consistent.
Get started
Open the recorder, run the two 30-second tests above, and keep whichever sounds more like you. If you have a good microphone, headphones and a quiet room, untouched usually wins. If you are on a laptop or a live call, keep clean-up on.
The free plan needs no card. Try Cheap Recorder in Chrome, and your recordings stay on your own disk.
Comments
No comments yet.
Sign in or make an account to comment.