Recording saved as WebM instead of MP4? Why, and the fix
If your recording saved as WebM instead of MP4, there are only two reasons in Cheap Recorder, and each has a simple fix. This post explains where the WebM came from, when it is fine as it is, and how to get an MP4: record straight to MP4 next time, or convert the one you have.
Why your recording saved as WebM instead of MP4
Cheap Recorder runs in Google Chrome on macOS, Windows and Linux. A normal recording is an MP4 with H.264 video and AAC sound. That combination plays almost anywhere. Only when the browser cannot record MP4 does the recorder fall back to WebM. That case is rare.
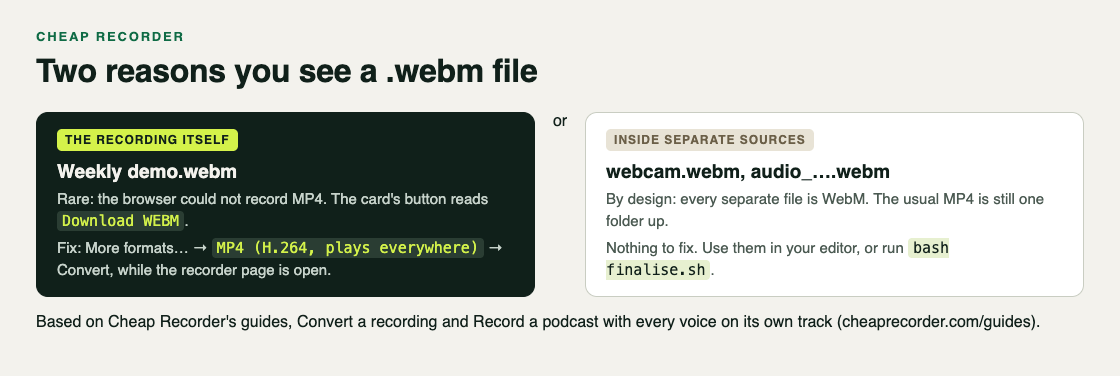
If you see a .webm file in your folder, check these two things:
- The browser could not record MP4. This is the rare case; the card's first button then reads Download WEBM.
- You ticked Also save every source separately. Then the recorder saves each source as its own WebM file in a folder called Separate sources, next to the usual MP4. These WebM files are meant to be there. You still have the MP4.
To see what you actually have, open the recording's folder. The guide to where recordings are saved lists what each folder should hold.
When WebM is fine and when you really need MP4
WebM is fine when:
- You only play the file in a browser.
- You are putting the video on a web page you control.
- The file is one of the separate tracks, for an editor that reads WebM.
You really need MP4 when:
- Someone will open the file on a phone or a computer you do not control.
- You are bringing it into a video editor that does not import WebM.
- You are sending it to a client who will double-click it and expect it to play.
If you are not sure who will open the file, send MP4.
Fix 1: record straight to MP4 in Chrome
The cleanest fix is to never get a WebM in the first place. In Cheap Recorder that means:
- Open the recorder in Google Chrome.
- Under Where to save, press Choose folder... and allow Chrome to edit files in that folder. Until you do, the start bar says choose a folder first.
- Type a name in Name this recording, for example Weekly demo.
- Leave Also save every source separately unticked, unless you want the separate WebM tracks as well.
- Press Start recording, then Stop and finish.
Your folder now holds Weekly demo.mp4. The card's first button reads Download MP4. The file is written to your disk every second while you record, so there is nothing to export.
If step 1 instead says This browser cannot write to disk, you are in a browser that cannot save to a folder. You can still record. The recording is kept in the browser's memory and downloaded when you finish. For anything long, switch to Chrome.
Run a short test before a real session. Record 30 seconds, stop, and check the file ending in the folder. A one-minute practice run catches the wrong format, a wrong microphone or a muted tab before they cost you a take.
Fix 2: turn a recording saved as WebM into an MP4
If you already have a recording you need in another format, Cheap Recorder can convert it from the card after you press Stop and finish:
- Open More formats... on the recording's card.
- Pick MP4 (or MOV for QuickTime, Final Cut or Premiere). The Convert button becomes active.
- Press Convert. A progress row shows each step with a timer.
The new file downloads and is also saved in the recording's folder next to the original, with the same name and the new ending. The original is never changed. The file goes to the Cheap Recorder server for this step, and the server deletes its copy when it finishes. Because the file travels, Convert needs an internet connection. The post on recording without internet covers what works offline and what does not.
About speed: the copy that takes seconds and loses nothing applies only when the picture is already H.264. A WebM holds VP9 video, so its picture has to be made again as H.264, which takes longer.
A few practical notes from the convert guide:
- The card, and so Convert, lasts only while the recorder page is open. Convert before you close the tab.
- For a long recording, keep the tab open and the computer awake until the row says the file is downloading. If your display tends to sleep, read how to keep the screen awake.
- If the server answers 502, it was too busy. Wait a minute and try again.
For the separate WebM tracks, there is another route. Open the Separate sources folder on a computer with ffmpeg installed and run bash finalise.sh. It writes a finished demo.mp4 there, applies any transcript cuts you saved, and adds your markers as chapters. If ffmpeg is missing, the script stops and says so. The separate tracks guide explains what each file in that folder is.
A quick check: which WebM do you have?
Open the recording's folder and look at two places.
- The top of the folder. If it holds
Weekly demo.mp4, your recording is an MP4 and nothing is wrong. If it holdsWeekly demo.webminstead, the browser could not record MP4; use Fix 2 while the recorder page is still open. - The Separate sources folder. If it exists, you ticked Also save every source separately. Its files, such as
webcam.webmand theaudio_files, are WebM by design, one per source, and the usual MP4 sits one folder up.
If the card is already gone because you closed the page, the original is still in your folder. The fix for next time is the same: record in Chrome, and run a 30-second test first so you see the file ending before a long session.
Frequently asked questions
What if my WebM file will not open in a player or app?
WebM support differs from one player and app to the next. If the one you need will not open the file, convert it to MP4 or MOV, which hold H.264 video and play almost anywhere.
Can I just rename .webm to .mp4?
No. Renaming changes the label, not the box or the streams inside. Some players will still guess the contents and play it, but editors and phones often refuse. Convert it properly instead.
Will converting to MP4 make the file bigger?
It can. A WebM's picture has to be made again as H.264, so the size changes. Keep the original until you have watched the new file all the way through.
Get started
Open the recorder in Chrome, choose a folder, name your recording and press Start recording. You get one MP4 with your screen, voice and webcam on your own disk, plus a transcript, with no export step. If you ever need MOV or MP3, Convert is on the card.
The free plan needs no card. Try Cheap Recorder in Chrome, and your recordings stay on your own disk.
Comments
No comments yet.
Sign in or make an account to comment.