Save the webcam as its own file for editing later
If you want to save the webcam as its own file, tick one box before you record. Cheap Recorder then keeps the camera in a file of its own next to the usual MP4, so you can place it, size it or cut it in your own editor later. This post covers that box, what lands in your folder, and how to use the camera file afterwards.
Why save the webcam as its own file
By default Cheap Recorder gives you one MP4, and the camera sits where you put it in the Preview, because the preview is the recording. That works well when you know the layout you want before you start.
Sometimes you do not. You may want the camera big for the intro, small in a corner during the demo, and gone during a code walkthrough. You may want to cut it on the one slide where it covers something. Once the camera is part of the screen picture, you cannot move it. With a separate camera file, you make those choices in your editor after the take.
The one box to tick: Also save every source separately
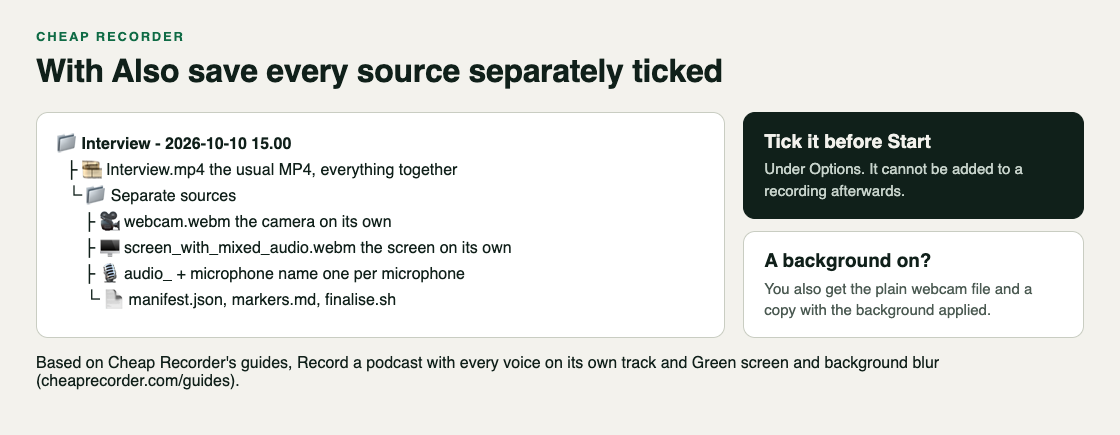
The option is called Also save every source separately, and it sits under Options. Tick it before you press Start recording; it cannot be added to a recording afterwards.
With it ticked, you still get the usual MP4. The recorder also saves each source as its own WebM file in a folder called Separate sources, inside the recording's folder:
- webcam.webm, if your camera was on. With a background on (Blur or a picture), you also get the plain webcam file and a copy with the background applied.
- screen_with_mixed_audio.webm, the screen on its own, when your layout puts the screen and camera together.
- One audio file per microphone, named after the microphone and starting with
audio_. - audio_meeting_far_end.webm for the other side of a call, if you picked one.
- Helper files, including manifest.json (a list of what was recorded), markers.md and finalise.sh.
Separate files take more room than a single MP4, so pick a folder with plenty of free space. The separate tracks guide lists every file in full.
A worked example: one lesson, camera placed later
Say you are recording a tutorial called Lesson 03 and want to decide where the camera goes after you see the footage.
- Open Cheap Recorder in Google Chrome on macOS, Windows or Linux.
- Under Where to save, press Choose folder... The recorder does not remember the folder between visits, so you choose it each time.
- Type
Lesson 03in Name this recording. The folder gets that name plus the date and time. - Under What to capture, pick A window or A browser tab. One window keeps other apps, tabs and private things out of the shot.
- Leave Record my webcam on and set the background now; the recording keeps the one that was on when you pressed Start recording.
- Keep a layout that has both the screen and the camera, such as Picture in picture. That way you get the finished MP4 to share as it is, plus the screen and the camera as separate files. Which layouts you have is listed under What you can do on this plan.
- Under Options, tick Also save every source separately.
- Press Start recording. At the start of each section, press M or Add marker. When you finish, press Stop and finish.
Before a long session, record a 30-second test this way and open the Separate sources folder. Check that webcam.webm is there and plays. The counter by the timer shows how many MB have been written, so the test also shows you how fast the folder fills.
Line up the camera and the screen in your editor
Every file comes from the same take, so the job in your editor is to line them up at the start and check they stay together.
- Give yourself a sync point. Clap once on camera right after you press Start recording. It shows as a spike in the sound and a clear moment in the picture.
- Use the markers. With every source saved separately, your markers are written to markers.md in the folder, so you can jump to each section on every track.
- Line up starts, not ends. A source that stopped early has a shorter file; matching the ends would push everything out of step.
Then put the screen file on the lower video track and the camera file on the track above. Place it in a corner, scale it up for the intro, cut it where it covers something, or crop it into a smaller shape. Use the plain webcam file if you want to replace the background yourself, or the copy with the background applied if you liked it in the preview. Take your voice from the audio_ files, so each microphone sits on its own track.
If you only want a quick finished cut, run bash finalise.sh in the Separate sources folder on a computer with ffmpeg installed. It makes demo.mp4, applies any words you cut in the transcript, adds your markers as chapters, and turns each microphone's file into a WAV.
What changes on the card in this mode
With every source saved separately, the card for your recording does not offer Download MP4 or Convert. That is expected: every file is already in the folder you chose, so open it there. On Creator and up, the same mode also writes a publish page you can hand to a client; the client demo post shows how.
When there is no webcam file
The webcam box said no camera found. Then Record my webcam was switched off and there is no camera to save, though your voice can still be recorded. Check that no other app, such as a video call, is using the camera and that Chrome may use it in your computer's privacy settings, then turn Record my webcam off and on again. No camera found in Chrome walks through each cause.
The box was not ticked. A single MP4 was saved, and the separate files cannot be added afterwards. Tick it and record again.
One file is shorter than the others. A microphone that disconnects has its sound end at that point, and a call tab whose share ends is silent from then on and cannot be added back to a running recording. Line the files up at the start. See what the file keeps when a microphone drops out.
Frequently asked questions
Do I still get a normal MP4?
Yes. The usual MP4 is still saved in the recording's folder, and the separate files go in the Separate sources folder inside it. The card just does not offer Download MP4 in this mode, so open the folder.
What format is the separate webcam file?
WebM, named webcam.webm. Check that your editor opens WebM files with your 30-second test, before a long session.
Does saving every source separately take more space?
Yes. Separate files take more room than a single MP4, and with a background on you get two camera files. Watch the MB counter by the timer during a test.
Can I turn it on after I have recorded?
No. Tick Also save every source separately under Options before you press Start recording.
Get started
Open the recorder in Chrome, choose a folder, switch your webcam on, tick Also save every source separately and record a 30-second test. Open the Separate sources folder, find webcam.webm, and drop it into your editor. Once that works, record the real thing.
The free plan needs no card. Try Cheap Recorder in Chrome, and your recordings stay on your own disk.
Comments
No comments yet.
Sign in or make an account to comment.