Screen recording to GIF: short silent loops for docs and chat
A screen recording to GIF is the quickest way to show one small action inside a document or a chat thread. A short silent loop plays the moment someone scrolls past it, with no play button and no sound to switch on. Here you will plan a clip of a few seconds, record it in Chrome with Cheap Recorder, and convert it to a GIF that works in a README, a help page or a team chat.
Why a short silent GIF beats a video link
A video link asks for a click, then a page load, then a choice about sound. A GIF needs none of that. It sits in the text, starts on its own and repeats until the reader has seen what you meant.
That suits the small questions people ask all the time. Where is the export button? How do I drag this column? What does the error look like? Each one is a single action, and a loop of a few seconds answers it better than a paragraph of steps.
A GIF has no sound, so the picture does all the work. That shapes how you plan the clip.
Plan the loop: one action, a few seconds
Before you press anything, write down the one action the GIF shows. One. If you catch yourself writing "and then", you have two GIFs.
- Start state. Decide what is on screen in the first frame. The loop jumps from the last frame back to this one, so it should make sense on its own.
- The action. A click, a drag, a menu opening, a field filling in. Move the mouse slowly and directly. Fast, wandering movements are hard to follow in a loop.
- End state. Hold still for a second on the result so the reader sees it before the loop starts again.
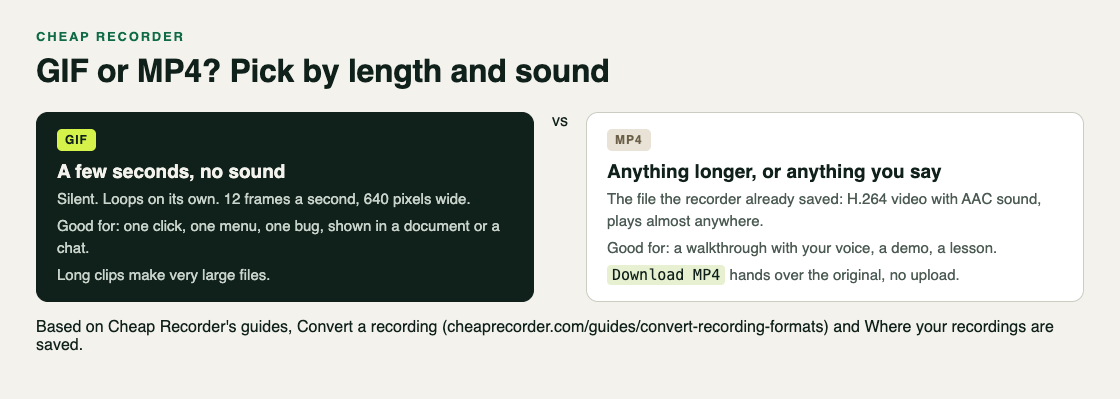
- Length. A few seconds. Cheap Recorder's own guide says a GIF is great for a few seconds in a document or a chat and becomes very large for anything long.
Since there is no sound, do not narrate. If the action needs words, put them in the text next to the GIF.
Record a clean clip in Chrome
Cheap Recorder runs in Google Chrome on macOS, Windows and Linux, with nothing to install. Here is a setup for a GIF clip.
- Pick the smallest area that shows the action. Under What to capture, choose A window or A browser tab rather than Whole screen. One window or tab keeps other apps, tabs and private things out of the file.
- Switch off Record my webcam. The file then holds the screen alone, which is what a GIF needs.
- Choose a folder. Under Where to save, press Choose folder... The recorder does not remember the folder between visits, so you choose it again each time.
- Name it. Type a clear name in Name this recording, such as
Export button. The name is used for the file and its folder, so the GIF later arrives asExport button.gif. - Clean the screen. Anything on the shared window ends up in the file. Close what you do not need and silence notifications.
- Record. Press Start recording, wait a beat, do the action, hold on the result, then press Stop and finish.
If Start recording stays grey, read the note beside it; this post explains each note.
Two small tips. Use Stop and finish, not Chrome's own Stop sharing bar, because that bar also finishes the recording. And a silent GIF does not need a transcript: if you would rather no audio left your computer for this clip, untick Live transcript under Options before you start, since Chrome sends the microphone audio to Google to turn it into text.
Trim at record time, then turn the screen recording to GIF
Convert uses the recording exactly as it was made. Words you cross out in the transcript change the transcript and captions, not the converted file. So the trim happens when you record.
For a clip of a few seconds, the fastest fix for a messy start or a slow ending is a retake. Each take gets its own folder, named with the name you typed plus the date and time it began, and a second take in the same minute gets (2) on the end, so your takes sit together when you sort by name.
When you have a clean take, convert it from the card that appears after Stop and finish:
- Open the menu that reads More formats... on the recording's card.
- Pick GIF. The Convert button becomes active once a format is picked.
- Press Convert. A progress row shows each step with a timer, and the download starts when it is ready. Cancel on the row stops it and says Stopped. Nothing was downloaded.
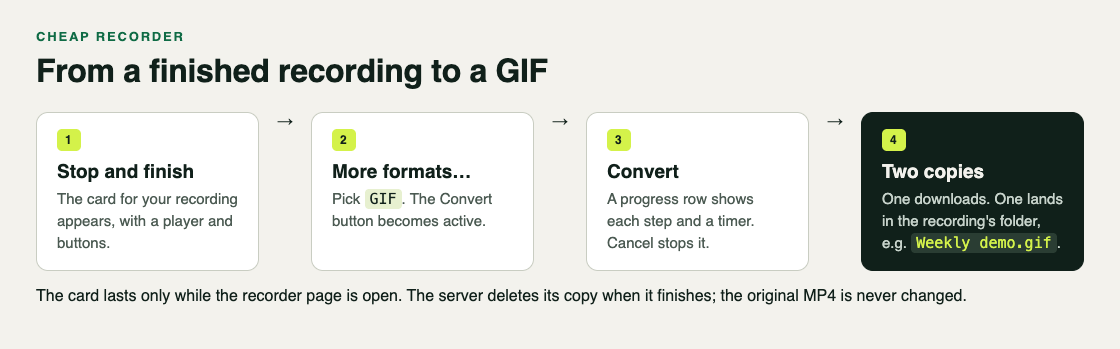
The GIF downloads and is also saved in the recording's folder, next to the original MP4, with the same name and the new ending. The original is never changed. To convert, the file goes to the Cheap Recorder server and back, and the server deletes its copy when it finishes. That means Convert needs an internet connection; screen recording without internet lists what works offline and what does not.
The card lasts only while the recorder page is open, so convert before you close the tab. If you forget, the MP4 is still safe in your folder, but the card and its Convert button are gone. The convert guide covers every format, and converting to MP4, MOV, GIF or MP3 walks through the other formats.
Keep the GIF small and readable
Cheap Recorder makes every GIF the same way: silent, looping, 12 frames a second and 640 pixels wide. You do not set these, so the lever you control is length. Every extra second adds 12 more frames, and the file grows with it.
- Keep it short. If it runs long, split it into two GIFs or send the MP4.
- Record a window, not the whole screen. The GIF is 640 pixels wide either way, so a wide screen is shrunk a lot more than a small window, and its text gets harder to read.
- Enlarge what matters. Zoom the app or the page in before recording so the button you are showing is still big at 640 pixels.
- Keep the screen calm. The GIF format holds a limited set of colours per frame. Flat screens convert cleanly; photos, gradients and playing video look rough and make the file bigger.
- Move less. Fewer changes between frames usually means a smaller GIF. Avoid scrolling past large areas unless scrolling is the point.
Where a screen recording GIF works best
- READMEs. Show the one screen that proves the project works.
- Help pages. Put a loop beside each step that involves a drag or a hidden menu.
- Team chat. Answer "where is that setting?" with a loop instead of a screenshot and three arrows.
- Bug reports. A loop of the click and the wrong result says more than a description. For a longer report with your voice, see screen recording for bug reports.
- Tickets and pull requests. A before and after pair of short loops makes a small change obvious.
Drop the file straight into the page or the chat. It also stays in the recording's folder, so you can find it later by name.
When to send the MP4 instead
A GIF is the wrong tool once the clip needs sound, runs long, or covers more than one idea. Send the MP4 when:
- You explain why, not just what. Your voice carries that.
- The walkthrough runs past a few seconds.
- Viewers need to pause or go back.
- You want a transcript or captions next to it.
The same recording gives you both. Download MP4 hands you the original, H.264 video with AAC sound, straight from your computer with no upload, and Convert makes the silent loop. A recording of sound only is an M4A file, which has no picture to turn into a GIF.
Frequently asked questions
Can a GIF include sound?
No. Cheap Recorder's GIF is silent. If the clip needs your voice, share the MP4 instead.
How long should a screen recording GIF be?
A few seconds, showing one action. The GIF runs at 12 frames a second, so each extra second adds frames, and a long GIF becomes very large.
Why is my GIF so large?
Usually because the clip is too long or the screen is busy, with photos, gradients or lots of movement. Record a shorter clip of one window with a calm screen, and convert again.
Does converting change my original recording?
No. The original MP4 is never changed. The GIF is saved next to it in the same folder, and the server deletes its copy when it finishes.
Get started
Open the recorder in Chrome, pick one window, switch the webcam off, choose a folder and record a few seconds of one action. Then open More formats..., pick GIF and press Convert. Your MP4 and your GIF sit side by side in the same folder on your own computer.
The free plan needs no card. Try Cheap Recorder in Chrome, and your recordings stay on your own disk.
Comments
No comments yet.
Sign in or make an account to comment.