Separate WAV files for each podcast voice, from Chrome
If you edit a podcast, you want separate WAV files for each podcast voice: one file per person, so you can make a quiet guest louder or cut a cough without touching anyone else. Once voices are mixed into one file, they stay mixed. This post shows how to record every voice to its own file in Chrome with Cheap Recorder, turn each one into a WAV with one command, and line them up in your audio editor.
Why one WAV per voice makes the edit easier
Most podcast fixes are about one person. Your co-host coughs while you talk. Your guest sits too close to the microphone. You want to cut a long pause on one side without chopping the other person's laugh.
With one file per voice, each of those fixes happens on one track. With a single mixed file, every cut hits everyone at once. Cheap Recorder already saves each voice as its own file when you ask it to. Those files are WebM, which some audio editors do not open. The WAV step closes that gap.
Before you record: one microphone per person
The rule is one microphone per person, all plugged into the same computer. Wired or USB microphones work best. Do not use a Bluetooth headset as a microphone, because it drops to a low-quality mode when used that way.
- Headphones for everyone, so no microphone picks up a speaker.
- Sit a little apart. Microphones in one room hear each other, so a loud neighbour will be faintly audible on your track.
- Use microphones with clearly different names. Each file is named after its microphone, so two different names are easier to tell apart in the folder.
- Check the microphone limit. Some plans limit how many microphones you can record at once, and the start bar tells you if you tick too many.
- Ask first. Get your guests' agreement to be recorded before you start.
For more on the room itself, see two hosts in one room on one laptop.
Record every voice as its own file
Everything below happens in the recorder page in Google Chrome. The one setting that matters is Also save every source separately. It must be ticked before you record; it cannot be added afterwards.
- Under Where to save, press Choose folder... and pick a folder with plenty of free space. Separate files take more room than a single MP4.
- Type the episode in Name this recording, for example
Episode 12. The name is used for the recording's file and its folder. - Open Change or add microphones and tick every microphone in the room.
- For a sound-only episode, switch off Record my webcam and do not pick a screen.
- If a guest joins by call, press Pick the call tab... in the Call audio tile, choose the call's tab and tick Share tab audio.
- Open Options and tick Also save every source separately.
- Press Start recording, then clap once, sharply. You will use that clap later.
When you press Stop and finish, the recording's folder holds the usual recording (an MP4, or an M4A file for a sound-only episode) and a folder called Separate sources. Inside it is one audio file per microphone, each starting with audio_, and audio_meeting_far_end.webm if you picked a call. You also get helper files: manifest.json (a list of what was recorded), markers.md and finalise.sh. The post on every voice on its own track goes through this recording step in more depth.
Make separate WAV files for each podcast voice with finalise.sh
finalise.sh is a bash script the recorder writes for you. It needs the free ffmpeg program on your computer. Open a terminal in the Separate sources folder and run:
bash finalise.sh
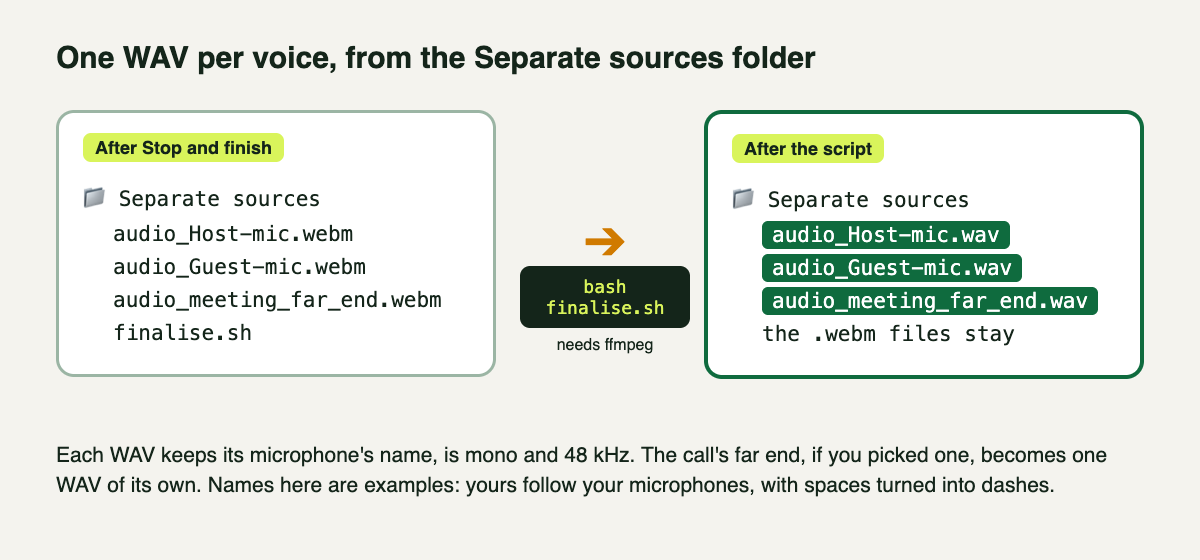
Each voice file gets a WAV with the same name. The WebM files stay where they are.
Here is what the script does, read from the recorder's own code:
- It checks for ffmpeg first. If ffmpeg is missing, it stops and prints
ffmpeg is not installed (brew install ffmpeg). Install ffmpeg, then run the script again. - It turns every
audio_file into a WAV with the same name. That includesaudio_meeting_far_end.webm, so the call gets its own WAV too. Each WAV is mono (one channel) at 48 kHz. For each file it prints a line such as-> audio_Host-mic.webm to WAV. - It makes other files too. The same script also writes video files, such as
demo.mp4, which you do not need for the audio edit. - It leaves your originals alone. The WebM files stay in the folder, and the script ends by printing
done.
The file names follow your microphones. Spaces and other symbols in a microphone's name become dashes, so a microphone called USB Microphone gives audio_USB-Microphone.wav.
A worked example: a two-host episode with a remote guest
Say Priya and Sam host from one desk, each on a USB microphone, and their guest joins from a call in a Chrome tab.
- They tick both microphones, pick the call tab with Share tab audio, tick Also save every source separately, name it
Episode 12and press Start recording. - Priya claps once. They record the episode and press Stop and finish.
- In
Separate sourcesthere are three audio files: one for each microphone andaudio_meeting_far_end.webmfor the guest. - Sam opens a terminal in that folder and runs
bash finalise.sh. Three WAVs appear next to the WebM files. - They copy the three WAVs into their audio editor, one track each, and line them up on the clap.
Before recording the real episode, a thirty-second test with everyone saying their name is worth it. Open the folder and check there is one audio_ file per microphone.
Line the WAV files up in your editor
The recorder opens the sources one after another when you press start, so the files can begin a fraction of a second apart. That is what the clap is for. Put each WAV on its own track, find the sharp spike of the clap on every track, and slide the tracks until the spikes line up. They stay together from there.
If you want to rename files to people's names before you hand them over, go ahead: recorded files are ordinary files. Finish any downloads or conversions from the recording card first, because the card reads the file from where it was saved.
When you only have one mixed recording
If you recorded without Also save every source separately, there are no per-voice files to convert, and the option cannot be added afterwards. You can still get one WAV of everyone together: Convert on the recording card offers WAV, at 16-bit and 48 kHz. Convert sends the file to Cheap Recorder's server, which deletes its copy when it finishes. The post on converting a recording walks through it.
Frequently asked questions
Does the remote guest get their own WAV?
The call gets one WAV, audio_meeting_far_end.wav. Everyone on the far end of the call shares that one track; if two remote guests need separate tracks, each has to record themselves.
What format are the WAV files?
Each WAV made by finalise.sh is mono, at 48 kHz, named after its source file. A WAV made with Convert on the card is one file of the whole recording, at 16-bit and 48 kHz.
What if the script says ffmpeg is not installed?
The script needs ffmpeg and stops when it cannot find it, with the message ffmpeg is not installed (brew install ffmpeg). Install ffmpeg on that computer and run bash finalise.sh again in the same folder.
Can I get separate voices from a recording I already made?
Only if Also save every source separately was ticked before you pressed start. Otherwise the voices are mixed, and Convert can give you one WAV of the mix.
Get started
Plug in one microphone per person, tick Also save every source separately, clap once at the start, and run bash finalise.sh when you finish. The podcast separate tracks guide has the full setup. Start free with Cheap Recorder in Chrome: the Free plan needs no card, and your recordings stay in a folder on your own computer.
Comments
No comments yet.
Sign in or make an account to comment.