Zip a screen recording folder so the demo page opens
A Cheap Recorder demo page looks perfect on your own computer. Then you attach publish.html to an email, and your client opens a page with an empty player. The fix is to zip a screen recording folder, the whole one, before you send it. This post shows why the page needs its folder, what has to be inside, how to zip it on a Mac or on Windows, how to test the zip, and what to do when it is too big for email.
Why the demo page breaks when you send it alone
The page is not one self-contained file. When you tick Also save every source separately before you record, Cheap Recorder writes a folder called Separate sources inside the recording's folder, and publish.html lives there. The client demo guide says it plainly: the page plays the MP4 one folder up and links to the other files by their names, so it only works when they sit where the recorder put them.
That gives two ways to break it:
- Send only
publish.html. The page has no video and no files to link. - Send only the
Separate sourcesfolder. The links to the separate files work, but the player still looks one folder up for the MP4, and it is not there.
The guide's answer is the one this post is about: zip the recording's folder and share the zip.
One thing to check first. The page is written only in this mode, and on the standard plans it is on Creator and up. If you forgot the tick, a single MP4 was saved and there is no page; you cannot add it afterwards, so tick it and record again.
What has to be in the folder before you zip it
Open the folder you chose under Where to save. Each recording has its own folder, named with what you typed in Name this recording and then the date and time it began, for example Weekly demo - 2026-09-14 10.30. That outer folder is the one you zip.
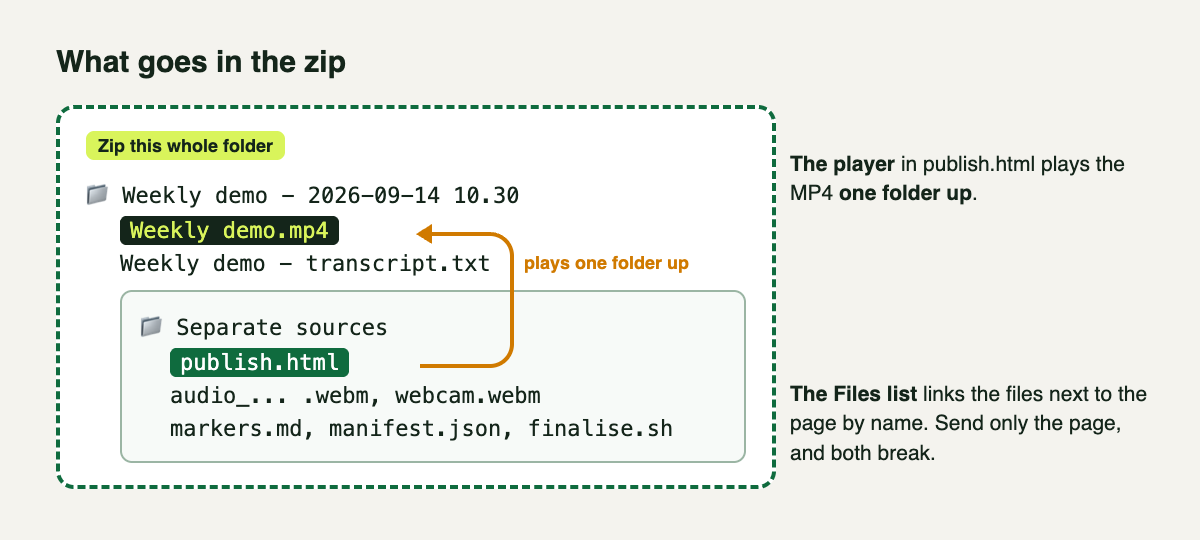
Zip the outer folder. The page in Separate sources plays the MP4 one level up.
Inside it you should see:
- The recording itself, named after it, such as
Weekly demo.mp4. This is what the page's player shows. - The transcript, such as
Weekly demo - transcript.txt, if the live transcript was on and heard speech. - The
Separate sourcesfolder, withpublish.html, oneaudio_file for each microphone you ticked,audio_meeting_far_end.webmif you picked a call tab,webcam.webmif the camera was on, the caption files,markers.md,manifest.jsonandfinalise.sh.
Leave the separate files in place even though they take room. The page has a Files list with a download link for each one, and those links point at the files by name.
If you cut words from the transcript
Cutting words in the Transcript fold and pressing Apply edits and rewrite files rewrites the page's transcript, but the page keeps playing the uncut MP4. To send a cut video too, run bash finalise.sh inside Separate sources on a computer with ffmpeg installed. It makes demo.mp4 there, with your cuts applied and your markers as chapters. Do this before you zip, so demo.mp4 travels in the same zip. The filler words guide covers the cutting itself.
How to zip a screen recording folder on a Mac or on Windows
First, finish anything you still want from the recording card. The card reads files from where they were saved and lasts only while the recorder page is open; after that, the folder is ordinary files you can move, rename or zip. In this mode the card does not offer Download MP4 or Convert anyway, because everything is already in the folder. More on that in where recordings are saved.
On a Mac
- Open a Finder window at your save folder.
- Control-click the recording's folder, for example
Weekly demo - 2026-09-14 10.30. - Choose Compress. Apple's zip help page says one item becomes a
.zipwith the same name.
Compress the one folder, not a handful of files picked inside it. Apple names a zip of several items Archive.zip, and loose files lose the folder layout the page needs.
On Windows
- Open File Explorer at your save folder.
- Right-click the recording's folder.
- Select Show more options, then Send to, then Compressed (zipped) folder. Microsoft's zip help page says a zipped folder with the same name appears in the same place.
Worked example: test the zip in one minute
Testing on your own folder proves nothing, because the original files are still next to the page. Test the zip the way your client will meet it. Say your demo is Invoice screen walkthrough - 2026-10-11 09.15 and you have just zipped it.
- Copy the zip to a new place, such as a fresh folder on your desktop, or another computer.
- Unzip it. On a Mac, double-click it. On Windows, use Extract All.
- Open the unzipped folder, then
Separate sources, thenpublish.htmlin Chrome. - Press play. If the player is empty, check that
Invoice screen walkthrough.mp4is in the outer folder. - Click a chapter time. The player should jump there. "No chapters were marked." means no M or Add marker was pressed while recording.
- Click a time in the transcript, and check the speaker names read the way you set them.
- Click one link in the Files list. It should open or download that file.
If all of that works, the zip is ready to send. To rehearse the whole thing before a real client, the guide suggests a one-minute practice with two markers; zip that and run the same test. Our post on a practice run before a client demo walks through it.
When the zip is too big for email
Separate files take more room than a single MP4, so a demo folder grows quickly. Email has limits. Google's Gmail attachments page says a personal Gmail account can attach up to 25 MB, and a work or school account's limit is set by its administrator. Over the limit, Gmail removes the attachment and adds it as a Google Drive link instead.
Your choices:
- Send a link to the zip. Put the zip itself on a drive you already use and send the link. The folder layout is inside the zip, so the page works once your client downloads and unzips it.
- Keep demos short. One idea per recording makes a smaller folder.
- Split the story, not the folder. Two short recordings make two zips that each work. Never split one recording's folder across emails.
Remember what changes when you upload. The guide says nothing is uploaded by Cheap Recorder: the page and files stay on your computer until you choose to send them. Once the zip is on a drive, it lives there too.
Tell your client how to open it
Your client may never have opened a page from a zip. Put the steps in the email, for example:
Here is the invoice screen walkthrough. Unzip the file, open the folder, then Separate sources, and double-click publish.html. Click any chapter or transcript line to jump to it. demo.mp4 in the same folder is the tidied video.
Leave out the last sentence if you did not run finalise.sh. If anyone else's voice is in the demo, tell them before you record; recording calls may need everyone's agreement depending on where you and they are.
Frequently asked questions
Why does my demo page show no video after I email it?
The page plays the MP4 that sits one folder above Separate sources. If you sent only publish.html or only that folder, the MP4 did not go with it. Zip the whole recording folder and send that.
How big a zip can I send by Gmail?
Google says 25 MB for a personal account, and a work or school administrator sets their own limit. Over that, Gmail turns the attachment into a Google Drive link.
Can my client open publish.html without unzipping?
Ask them to unzip first. The page only works when its files sit where the recorder put them, so open it from the unzipped folder.
Can I add the demo page to a recording I already made?
No. The page is written only when Also save every source separately was ticked before recording. Tick it and record again.
Get started
The demo page is on Creator and up: Creator is $12 a month billed monthly, or $4.99 a month billed yearly, with a 7-day free trial. The Free plan covers recording, the live transcript and captions, so you can practise first. Start recording in Chrome, tick Also save every source separately, press M at each new part, then zip the folder and send it.
The free plan needs no card. Try Cheap Recorder in Chrome, and your recordings stay on your own disk.
Comments
No comments yet.
Sign in or make an account to comment.